


XMap User Guide
76
• You must select to show contours in the Display tab of the Options dialog box to
view any changes made to the contour properties on the map. See Displaying
Basic Map Features for information on showing/hiding contours.
• XMap remembers the last customized contour values. For example, if you
customize your contour settings and then change the settings to the default, the
next time you try to customize your contour settings the last saved customized
values display.
To Change the Contour Properties
Use the following steps to change the properties of contours.
1. Click the Map Data tab.
2. Under Secondary Map or Primary Map, click the plus sign next to the
dataset for which you want to modify the properties.
3. Click the plus sign next to the sub-data category.
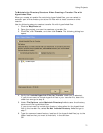
4. Right-click Contours and click Properties.
The Contour Properties dialog box opens (for Contours).
5. Select a contour option (Default, High Density, Low Density, or Custom) from
the drop-down list.
• Default—Uses the default values for displaying contours and labels.
• High Density—Approximately doubles the default values for
displaying contours and labels.
• Low Density—Approximately halves the default values for displaying
contours and labels.
• Custom—Allows you to customize how contours and labels display on
the map.
6. For Contours, select the data zoom level at which you want labels to begin to
display.
7. Click Next.
8. If you selected Default, High Density, or Low Density in step 5, go to step 9.
OR
If you selected Custom in step 5, you can customize the contour display by
choosing the distance (in feet or meters) between contours and how many
minor (unlabeled) contour lines for every major (labeled) contour line.
• For a given range of data zoom levels, type the distance (in feet or
meters) between contour lines for those data zoom levels.
• Type the number of minor lines for each major line. For example, type
0 to label every contour line or type 2 to label every third contour line.
Note
Labels display only on major lines beginning at the zoom level
that you specified step 6.
• Click Add/Change to update the contour rules list.
OR
Click Reset to reset the settings to what displayed when you first
launched the dialog box.
OR
Click Use Defaults to use the default values to display contours and
labels.
9. Click Next.
10. Under Set Data Zoom Range For Display, drag the gray tab marker to the
minimum and maximum level you want.