


XMap User Guide
296
Normal, Sharp, or Broad from the drop-down list.
Notes
• To reduce 24-bit images to 8-bit, click the Reduce button.
• To modify the transparency color that displays in the image window,
select a color from the drop-down list to the right of the transparency
button.
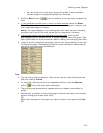
14. Click WorkFile.
Note The WorkFile contains the registration points and a reference to the
source image file. WorkFiles are saved in C:\...\DeLorme Docs\WorkFiles.
15. Change the WorkFile name in the WorkFile text box.
16. Click Save.
The WorkFile is available in the table in the WorkFile subtab.
Tips
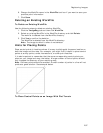
• Magnify the image in the image window and zoom in on the map in the map
window until image and source are approximately the same viewing
resolution. For example, zoom in on the source map in the map window to a
street that appears to be about an inch in length on your screen. Now, adjust
the magnification of the image in the image window until the same street is
also about an inch in length on the screen. If your images or maps appear too
pixilated, decrease magnification on the left and zoom out on the right.
• Clear the Link to Map check box to pan and zoom the map window without
affecting the map center of data zoom level of the image window.
• Select the Enable check box to preview the map features which were not
made transparent.
• To undo/redo a transparency selection, click the Undo tool
or Redo
tool. Click Reset to clear all transparency edits to the image.
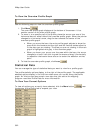
Modifying Existing WorkFiles
You can modify an existing image by adding or deleting points.
To Modify an Existing WorkFile
Use the following steps to modify an existing WorkFile.
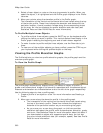
1. Click the ImageReg tab and then click WorkFile.
2. Select an existing WorkFile in the WorkFile directory and click Open to load
the image.
The registered image and the points you created display in the image window
on the left side of the screen. You are now in Register mode and the Point Box
displays your point information.
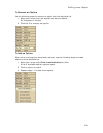
3. Modify the points as appropriate. To change a specific point, enter new
coordinate information by clicking and typing in the point information boxes in
the Point Box or click the point number in the Point Box and then click the
highlighted point in the image or map window and drag it to a new location.
Note If you must move the same point in each window, the best method is
to delete that point and then add a new point. To delete a point, click it in the
Point Box and then click Delete.
4. Click Done when edits are complete.
5. Click WorkFile.