


XMap User Guide
192
Note If you do not select the Add Layer to Workspace check box, you can
add the layer to your workspace layer using the Manage Layers dialog box.
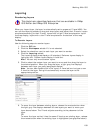
10. Click Check-out.
The grids selected in step 4 are highlighted on the map with the layer name
selected in step 6. The check-out layer's user name, layer name, target
database, creation date, grid count, and comments display in the Check-
out/in table.
Note If any warnings were detected during the check-out process, you
receive a message asking you if you want to continue (and also if you want to
save the warnings in a text file by clicking Save to File).
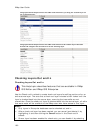
To Check-in a Layer
Important Once a check-out layer is checked-in, the changes cannot be undone.
Be sure to visually inspect the attribute and geometry changes in the check-out layer
before checking them into the source layer.
Use the following steps to check-in a check-out layer.
1. Click the GIS tab and then click the Check-out/in subtab.
2. Select the source layer that contains the check-out layer you want to check-in
from the Source Layer drop-down list.
3. Click Check-in.
The layer is checked into the source layer and the check-out layer is deleted
from its database.