


Working With GIS
183
Query
Creating a Query
This Help topic describes features that are available in XMap
GIS Editor and XMap GIS Enterprise.
Use the Query subtab to build custom attribute queries to run against the layer
selected in the workspace. You can also use the Query subtab to create spatial
queries, allowing you to see patterns between two layers. Queries saved in a
database are available to everyone you share your data with either as a DeLorme
OpenSpace transfer file or on your XMap Web site.
You can customize your default query option settings.
To Create an Attribute Query
Use the following steps to create an attribute query using the GIS tab.
1. Click the GIS tab.
2. Click the Query subtab.
3. Select the layer you want to query from the Layer drop-down list; only layers
in the workspace display in this list.
4. If a query is already displaying in the Query subtab, click the Manage button
and then click New.
5. Optional. To name the query something other than the default (the default
name is Query#), click the Manage button and then click Rename.
The Query text box activates and lets you edit the query name.
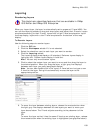
6. Click the cell under Attribute.
A drop-down list displays all of the attribute fields in the selected layer. Select
the field you want to query.
Note Selecting the GEOMETRY attribute creates a spatial query (see next
section below).
7. Click the cell under Operator and select an operator from the drop-down list.
The options in this list vary based on the attribute field's data type.
8. Click the cell under Criteria. A drop-down list displays all of the records
available for the field selected in step 6. Select the value (or enter a custom
value) that you want to use in your query.
9. If you want to create a complex query, click the cell under Logical Operator
and select a logical operator (And, Or, or And Not) from the drop-down list.
10. Optional. If you want to allow Web users or other XMap users to enter their
own values for the query, select the User Input check box next to the query
you want to share.
11. Optional. Repeat steps 6-10 in the next row(s) if you are creating a complex
query.
12.
Click Run.
13. If you selected User Input in step
10, the Run Query dialog box opens. Verify
the query is correct and then click Run.
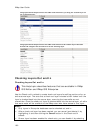
14. All objects that satisfy the query are highlighted on the map and the number
(count) of query results displays under Query Results. You can change how
query results display on the map using the tools in the Query tab. You can