


XMap User Guide
158
5. Click OK to return to the Symbolize Layer dialog box.
Deleting a Symbol Set from the List of Available Symbol Sets
Use the following steps to delete a symbol set from the list of available symbol sets.
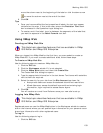
1. Click the Add button in the Symbolize Layer (for a point layer) dialog box.
The Add Symbols dialog box opens.
2. Under Existing Symbol Sets, click to highlight the symbol set you want to
remove.
3. Click Delete From List.
4. Click Yes to confirm the deletion.
5. Click OK to return to the Symbolize Layer dialog box.
Labeling a Layer
You can use the attribute information in your layer to label the features on the map
using the Set Label dialog box.
Notes
• To view labels created using these steps, the Show Label check box on the
Symbolize Layer dialog box must be selected.
• Labels have a 100-character limit in XMap 4.5-compatible databases and a 1000-
character limit in XMap 5.0 and later-compatible databases.
To Label a Layer
Use the following steps to label a layer.
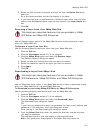
1. Click the GIS tab.
2. Click the Workspace subtab if it is not selected.
3. Select (highlight) the layer you want to label.
4. Click the Tools button and then click Label.
The Label Layer dialog box opens.
OR
Right-click the layer and click Label.
The Label Layer dialog box opens.
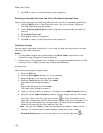
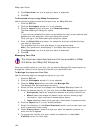
5. Type any text you want to display in the label in the Label Formula text box.
6. Optional. Under Label Columns, select a column header from the file to add
as a label. Then, click the right arrow button
to move the header to the
label area. Repeat this step for each column header you want to include in the
label. As you add headers to the label area, the Label Formula updates and
shows an example of what the label will look like.
Note You can click Clear to clear the selections you made in steps 5 and 6.
7. Optional. To reorder how the label displays, select the column under
Selected Columns you want to move and then click the up arrow
to