


Using Projects
73
5. Select the folder where you want to save the hyperlinked files. The default
location is C:\...\DeLorme Docs\Transfer Files. Transfer files have .dmt
extensions.
6. Click OK.
The imported project opens in the map view.
E-mailing a Transfer File
You can package a project and its contents into a single file, called a transfer file, to
facilitate e-mailing or copying. Transfer files do not include map data or GIS data.
To E-mail a Transfer File
This procedure creates an attachment file but does not permanently save a file to
C:\...\DeLorme Docs\Projects.
Use the following steps to e-mail a transfer file.
1. Click the Map Data tab.
2. Open the project you want to e-mail as a transfer file.
3. Click File, click Transfer, and then click E-mail.
A transfer file is created and your computer's default operating system e-mail
program opens with the transfer file included as an attachment.
4. Complete the e-mail in accordance with your e-mail program.
Changing the Properties of Your Data
Changing the Properties in Your Data Overview
You can adjust the properties of some data categories to accommodate your needs.
For example, you can adjust the shaded relief properties to account for the sun
shining in a different direction, have contours display at varying densities at
particular zoom levels, etc.
Each dataset contains its own sub-categories of data (raster, vector, contours, etc.).
Because of this, not all of the property information in this section of the Help will
pertain to every dataset.
Note It is important to remember that any changes made to the dataset properties
are permanent only when saved in a project.
Changing Imagery Display
When you use the Map Data tab to add imagery files, such as GeoTIFF, imagery, and
ImageReg data, or data and imagery downloads from NetLink, to a map—by default,
the image appears on top of any DeLorme vector base map by default. However, you
can customize the layering sequence so that selected vector map features (roads,
contours, etc.) appear on top of the image. Any added imagery files are listed in the
Map Data tree view under the appropriate series.
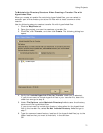
To Change the Properties of an Imagery File
Use the following steps to change the properties of an imagery file.
1. Click the Map Data tab.
2. Under Secondary Map or Primary Map, click the plus sign next to the
imagery series you want to modify.
3. Click the plus sign next to the specific imagery file you want to modify.
The types of imagery in the file display.