


XMap User Guide
118
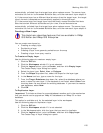
5. Under Data File, click the Browse button
and browse to the file location
you want to import. Once you find the file, double-click it or select it and then
click Open.
The Layer text box is automatically completed with the default layer name (the
file name portion of the file location or the name within the file) once you
select the file you want to import. The file information, such as file name,
location, file geometries, attribute fields, and coordinate boundaries, displays
in the information area.
Notes
• To rename layers once the file is imported, right-click the layer in
Workspace, click Rename, and then type a new name for the layer.
Layer names need not be unique in the database.
• If the layer you are importing contains many layers, select the layer you
want to import from the Layer drop-down list. You can import only one
layer at a time.
6. Optional. For a new layer, type a new name for the layer in the Name text
box.
7. From the Database drop-down list, select the database that you want to add
the layer to. You can also select Other to attach a different database to add
layers to. If you are importing a new layer, you can select New if you want to
create a new database.
8. If you are appending or replacing a layer, select the destination layer from
the Layer drop-down list.
9. Click Next.
10. If you are importing a layer that contains spatial reference information
(coordinates, datum, and projection), a progress bar displays and the import
process is complete.
OR
If you are importing a layer that does not contain spatial reference
information and is not a Geocode File Type (.asc, .csv, .dbf, .txt, .mdb, .xls,
.tab), go to the next step.
OR
If you are importing a Geocode File Type...
a. Verify how the data displays under Geocode Fields. If it does not
display correctly, under Data Delimiter Type, select the option that
separates your data into the appropriate columns. If your first row is
not a header row, clear the First Row is Header check box.
b. Under Geocode Fields, click the header for each column and select
the appropriate field option from the drop-down list.
c. Under Geocode By, select how you want to locate your field
information (Street Address, ZIP/Postal Code, or Latitude/Longitude).
Note The available Geocode By options are based on which fields are
assigned to the columns in step b.
d. Click Next. If you selected Street Address or ZIP/Postal Code as the
Geocode By option in step c, the import process is complete. If you
selected the Lat/Lon Geocode By option in step c, proceed to step 7.
OR
If you are importing a layer that contains a relative coordinate system...