


Chapter 15 Menus and Dialog Boxes 325
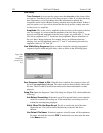
Apply All Settings:
Clicking on this button immediately sends all current
dialog values to the PG-200. Reprogramming of the PG-200 will take
several seconds. If you have only changed one or two dialog items, it is
better to click on the
Apply Changed Settings
button, which sends only
the new parameters to the PG-200.
OK:
Click on this button to close the dialog. Selecting this button does
not
automatically program the pulser/timing generator. To program the selected
values into the timing generator click on
Apply Changed Settings
or
Apply All Settings
.
Cancel:
The
Cancel
button exits the dialog without saving any settings. This
does
not
mean, however, that the pulser was not reprogrammed. The pulser
is reprogrammed when you click on
Apply Changed Settings
or
Apply
All Settings
. If you do this and then click
Cancel
, the new values will
already have been programmed into the pulser/timing generator.
Help:
Click on this button to open the online help for this window.
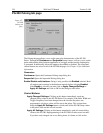
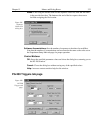
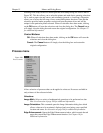
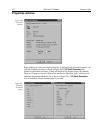
PG-200 Window
Operation of the PG-200 Pulser becomes available when you select Pulsers and then
PG-200 from the
Setup
menu. Note that pulser support must be selected when installing
the WinView/32 software for PG-200 control to be available.
The PG-200 parameters are set via the serial link between the computer and the PG-200
Pulsers. The choices provided by the PG-200 tab pages correspond to those provided by
the PG-200 front panel, and are described below and in detail in the PG-200 manual. The
PG-200 window contains the three PG-200 tab pages and the five buttons that are always
present independent of the selected tab page.
Figure 283.
PG-200
window.