


Chapter 15 Menus and Dialog Boxes 285
images show the effect of the selected changes. If the data set contains multiple frames,
you can specify which frames are to be reoriented. Image orientation can be applied to
data displayed as an image, graph or 3D Graph.
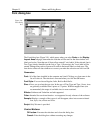
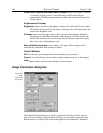
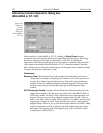
Selections
Rotate:
Clicking on this check box causes the image to be rotated 90° CCW.
Reverse:
Clicking on this check box causes the image to be reversed from left to right.
Flip:
Clicking on this check box causes the image to be flipped vertically.
Input:
If there is an active data window, it’s name will appear in the Input text box. You
can also directly select a data file using a browser, which can be accessed by
clicking on the button at the end of the Input data window.
Frame:
The two text boxes allow the frame range to be specified. If the data set
contains one frame, the indicated range will be 1 to 1. If the data set contains
multiple frames, the default is to select all frames. For example, if there were 10
frames, the frame range would be 1 to 10. Either value can be changed. For
example, if you only wanted the reorientation to be applied to frames three
through seven, it would only be necessary to change the Frame range values to 3
and 7 respectively.
X Range and Y Range:
In early releases of the software, simply indicates the frame
size of the data set. The values cannot be changed.
Datatype (input):
The input file datatype is displayed but cannot be changed.
Output:
You can name the Output file. The browser opened by the button at the right of
the Output text box allows the location and name to be more conveniently
specified.
Note:
If you use the browser, it is necessary to click on the browser button Save
and then on OK in the Image Orientation dialog box before the file is saved.
Datatype (output):
The output data type can be selected from the drop-down list.
Display Result:
Checking this box will cause the output data set to be displayed when
the OK button is pressed. If an Output filename has been specified, it will be
displayed with that name. If a name has not been specified, the name will simply
be “Untitled”.
Control Buttons:
OK:
Causes the selected orientation operations to be performed. If an output file
name has been specified, file will be saved.
Close:
Closes the dialog box without making any changes.
Help:
Accesses context sensitive help for this function.