


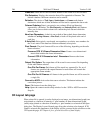

198 WinView/32 Manual Version 2.4.M
Adding an Available Button
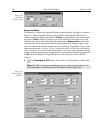
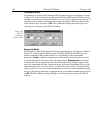
➧ Open the Customize Toolbar dialog by clicking on Custom Toolbar in the Setup
menu.
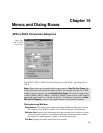
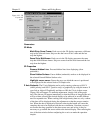
➧ Referring to Figure 181, note that the buttons available for placement on the Custom
Toolbar are listed on the left. Buttons already on the toolbar are on the right.
➧ To add an available button to the Custom Toolbar, first select it from the left-hand
list. You may have to scroll through the list of available buttons to find the one you
want. You can choose where to place the button by selecting a button on the right
side (which will then be highlighted). The new button will be placed before the
highlighted one.
➧ Click on the
Add
button. The button will disappear from the list of Available
buttons and will be added to the list of Toolbar buttons.
➧ Click on
Close
to close the dialog box.
Removing a Button
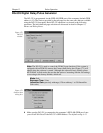
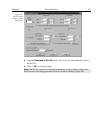
➧ Open the Customize Toolbar dialog by clicking on Customize Toolbar in the Setup
menu.
➧ Referring to Figure 181, note that buttons already on the toolbar are listed on the
right. Available but unused buttons are listed on the left.
➧ To remove an available button from the Custom Toolbar, first select it from the
right-hand list. You may have to scroll through the listed buttons to find the one you
want.
➧ Click on the
Remove
button. The button will disappear from the list of Toolbar
buttons and will be added to the list of Available buttons.
➧ Click on
Close
to close the dialog box.
Individual Dialog Item Descriptions
Available Buttons:
You can select the button you wish to add to the Custom Toolbar
from this section. Many buttons, each with its own preassigned function as
described below, are available.
Toolbar Buttons:
These are the buttons that will actually appear on the Custom
Toolbar.
Add:
Causes the selected button on the Available buttons list to be transferred to the
Toolbar buttons list before the selected button.
Remove:
Causes the selected button on the Toolbar list to be transferred to the
Available buttons list.
Close:
This button closes the Custom Toolbar Assignment dialog box and implements
changes made to the Custom Toolbar.
Reset:
Restores the default Custom Toolbar configuration.
Help:
This button opens the online help for the Custom Toolbar.