


Chapter 13 Pulser Operation 189
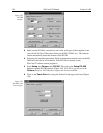
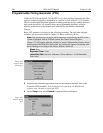
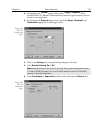
➧ Select
Bracket Pulsing On
or
Off
.
Note:
Bracket pulsing is only useful in low duty factor gated measurements in the
UV with the PI-MAX camera. See your PI-MAX manual (formerly ICCD-MAX
manual) for detailed information.
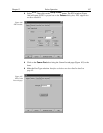
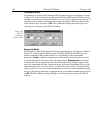
➧ If you select Bracket Pulsing ON, next select Anticipator ON or OFF. If ON is
selected, then set the Anticipator time.
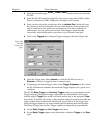
Note:
The Anticipator allows Bracket Pulsing with repetitive external trigger
sources. The Anticipator measures the trigger period and then turns on the
bracketing pulse timed to lead the photocathode gate pulse by the set interval. For
proper operation, the bracketing pulse must begin at least 500 ns before the gate
pulse.
The minimum Anticipator Time is 500 ns (or the minimum PI-MAX bracket lead
time from EEPROM)
minus
the minimum Pulse Delay time. For example, with a
minimum Pulse Delay time of 200 ns, the software would automatically set the
Anticipator time to 300 ns.
➧ For Burst operation, in which each trigger initiates a burst of gate pulses, select
Burst Mode ON and set the number of pulses in the burst and their period.
Note:
If bracket pulsing and Burst Mode are both selected, the entire burst will be
bracketed but not the individual pulses within a burst.
➧ Select
Continuous
or
Sequential
and then click on the adjacent
Setup
button.
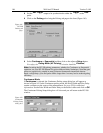
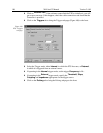
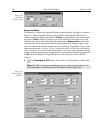
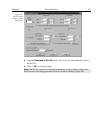
Continuous Mode
If Continuous is selected, the Continuous Pulsing setup dialog box will appear as shown
in Figure 170. In the Continuous pulsing mode, the Pulse Width and Pulse Delay remain
constant over the course of the measurement. See page 228 for additional information. If
operating in the Continuous Pulsing mode, simply set the Pulse Width and Pulse Delay
to the desired values and click on
OK
. The Continuous Pulsing Setup dialog box will
close and you will return to the PTG window.
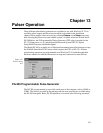
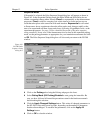
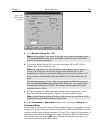
Figure 169.
PTG Pulsing
tab page.