


8: DMA Controller
GP4020 GPS Baseband Processor Design Manual 95
8.1.2 Set up example of DMAC for a Fly-by transfer from UART RX to memory
The following example shows the sequence of events required to program and enable the GP4020 DMAC to
provide a Fly-by data transfer from a UART Receiver input to an area of memory.
1) Initialise UART1 (or 2) for data reception:
1.1) For the UART 1 (or 2) Serial Control Register (CR):
1.1.1) Set to ”1” the Receive Channel Control bit (bit 0) to enable the UART 1 (or 2) receive channel.
1.1.2) Clear to ”0” the Clock Source bit (bit 2), to ensure the UART Clock is connected internally to the
UART_CLK source, from the System Clock Generator block (SCG).
1.1.3) Clear to ”0” the Flow Control Type bit (bit 3) of UART Serial Control Register (CR), to enable Software
Flow Control. There are no Hardware Control lines (RTS, CTS) for either UART1 or UART2 bonded
out on the GP4020 device.
1.1.4) Clear to “0” the Transmit Interrupt Enable bit (bit 5) to disable interrupts generated when the UART
transmit register is empty.
1.1.5) Clear to “0” the Modem Interrupt Enable bit (bit 7) and the Error Interrupt Enable bit (bit 6) to disable
interrupts from a remote modem or a UART error.
1.3) Set-up the appropriate UART baud rates, data lengths, stop bits, parity, etc using the Serial Mode Register
(MR) and Baud Rate Register (BRR); ref. Table 17.1 on page 170 thru to Table 17.11 on page 174 for
settings.
1.4) Set-up the source of DMAC Triggering (i.e. the prompt that initiates the DMA transfers following the DMAC
program cycle). The GP4020 DMAC can take triggers from both software and Hardware sources. For
DMAC Fly-by transfers using UART 1 as a peripheral, DMAC Channel 1 must be used. Similarly if using
UART 2 as a peripheral, DMAC Channel 2 must be used.
2.1) If software triggering is required (and not hardware triggering), this can be programmed explicitly into the
DMAC (refer to Section 8.3 "DMAC Triggering" on page 99).
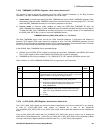
2.2) DMAC Channel 1 has the flexibility of being able to undertake Fly-by transfers using Hardware triggering
from a number of different sources. The trigger source required can be selected by setting up the DMAC
Trigger Source bits within the System Configuration Register (SCR) (Address 0xE000 2004) in the System
Services Module (SSM). In most cases, for fly-by transfers, it is most appropriate to use UART 1 as the
DMAC Trigger Source. However, the options shown in Table 8.1 Hardware Trigger Source selection for
DMAC Channel 1" above add flexibility to this.
2.3) DMAC Channel 2 can only receive DMAC hardware triggers from UART 2, and no other source.
Consequently, the trigger options listed in Table 8.1 above do not exist for UART 2 DMAC Fly-by
transfers.
2) Put DMAC into “Program Mode” to allow DMAC commands to be programmed into DMAC before execution.
This is done by clearing to ”0” the Channel Status bit (bit 0) of the Channel and Control Status Register (CSR)
for the relevant DMAC Channel (UART1 uses Channel 1, UART 2 uses Channel 2).
This allows the DMAC to be programmed with commands, and DMAC operations are suspended until bit 0 is
set to “1”.
Program the DMAC Channel for a Write data transfer from memory to UART 1 (or 2) for TX:
3.1) For the Channel 1 (or 2) Control and Status Register (CSR):
3.1.1) Set to ”1” the DMAC Hardware Request Status bit (bit 1), to allow Hardware requests (dreq and dack)
from the UART to control the DMAC function.