


16-32 ELECTRICAL SYSTEM
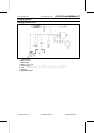
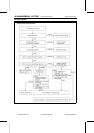
Charging System
Stator Coil Installation
•
Tighten the stator coil bolts to the specified torque.
Torque - Stator Coil Bolts: 12 N·m (1.2 kgf·m, 106 in·lb)
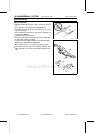
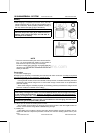
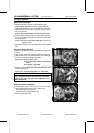
•
Apply silicone sealant to the circumference of the alter-
nator lead grommet, and fit the grommet into the notch of
the cover securely.
Sealant - Kawasaki Bond (Silicone Sealant): 92104-0004
•
Secure the alternator lead with a holding plate, and apply
a non-permanent locking agent to the thread of the plate
bolt and tighten it.
Torque - Alternator Lead Holding Plate Bolt: 10 N·m (1.0
kgf·m, 89 in·lb)
•
Install the alternator cover (see Alternator Cover Installa-
tion).
Alternator Rotor Removal
•
Remove the alternator cover (see Alternator Cover Re-
moval).
•
Clean off the oil from the outer circumference of the rotor.
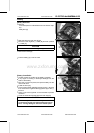
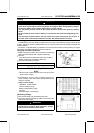
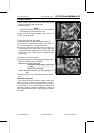
•
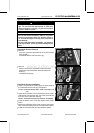
Hold the alternator rotor steady with the rotor holder [A],
and remove the rotor bolt [B] and washer.
Special Tools - Grip [C]: 57001-1591
Rotor Holder (Stopper, M38 × 1.5) [D]: 57001
-1658
Rotor Holder: 57001-1666
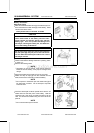
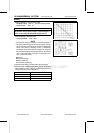
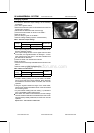
•
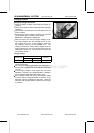
Using the flywheel puller [A], remove the alternator rotor
from the crankshaft.
Special Tool - Flywheel Puller, M38 × 1.5: 57001-1405
CAUTION
Do not attempt to strike the alternator rotor itself.
Striking the rotor can cause the magnets to lose
their magnetism.
Alternator Rotor Installation
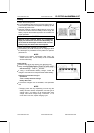
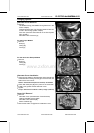
•
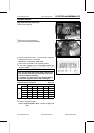
Using a c leaning fluid, clean off any oil or dirt on the fol-
lowing portions and dry them with a clean cloth.
Crankshaft Tapered Portion [A]
Alternator Rotor Tapered Portion [B]
•
Install the alternator rotor.
www.zxforums.com
www.zxforums.com
www.zxforums.com
www.zxforums.com
www.zxforums.com
www.zxforums.com
www.zxforums.com