ENGINE TOP END 5-41
Cylinder and Piston
•
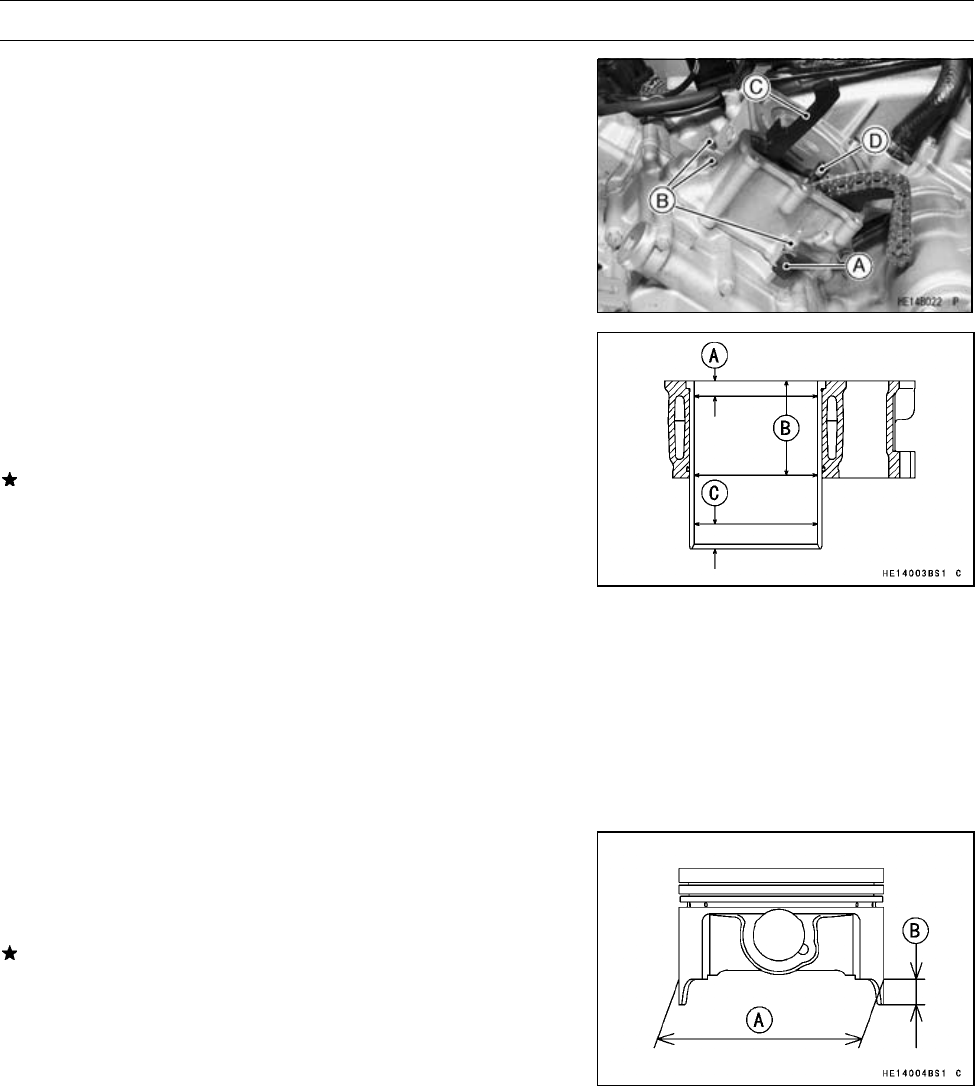
Install:
Cylinder
Clamp [A] (rear only)
•
Tighten:
To rque - Cylinder Bolts [B]: 9.8 N·m (1.0 kgf·m, 87 in·lb)
•
Install:
Chain Guide [C]
•
Apply oil to the O -ring on the oil pipe [D], and insert the
pipe.
Cylinder Wear
•
Since there is a difference in cylinder wear in different di-
rections, take a side-to-side and a front-to-back measure-
ment at each of the three locations (total of six measure-
ments) shown in the figure.
If any of the cylinder inside diameter measurements ex-
ceeds the service limit, replace the cylinder.
10 mm (0.4 in.) [A]
60 mm (2.4 in.) [B]
20 mm (0.8 in.) [C]
Cylinder Inside Diameter
Standard: 84.994 ∼ 85.006 mm (3.3462 ∼ 3.3467
in.), and less than 0.01 mm (0.0004
in.) difference between any two
measurements.
Service Limit: 85.10 mm (3.3 50 in.), or more than 0.05
mm (0.0020 in.) difference between any
two measurements.
Piston Wear
•
Measure the outside diam eter [A] of each piston 5 mm
(0.20 in.) [B] up from the bottom of the piston at a right
angle to the direction of the piston pin.
If the measurement is under service limit, replace the pis-
ton.
Piston Diameter
Standard: 84.964 ∼ 84.979 mm (3.3450 ∼ 3.3456 in.)
Service Limit: 84.81 mm (3.3390 in.)
Piston/Cylinder Clearance
•
Subtract the piston diameter from the cylinder inside di-
ameter to get the piston/cylinder clearance.
Piston/Cylinder Clearance
Standard: 0.015 ∼ 0.042 mm (0.0006 ∼ 0.0017 in.)


