


BRAKES 10-17
Master Cylinder
Rear Master Cylinder Re moval
•
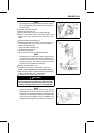
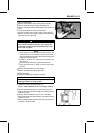
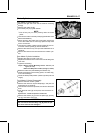
Remove the right side cover and the reservoir mounting
bolt [A].
•
Remove the cotter pin [B].
•
Pull off the joint pin [C] with washer.
NOTE
○
Pull off the joint pin while pressing down the brake
pedal.
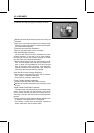
•
Unscrew the brake hose banjo bolt [D] (see Brake Hose
Removal/Installation).
•
When removing the brake hose, temporarily secure the
end of the brake hose to some high place to keep fluid
loss to a minimum.
•
Unscrew the master cylinder mounting bolts [E], and re-
move the master cylinder [F] with the reservoir.
•
Remove the reservoir cap, and pour the brake fluid into a
container.
•
Remove the reservoir and its hose from the master cylin-
der.
Rear Master Cylinder Installation
•
Replace the cotter pin with a new one.
•
Replace the washers are on each side of hose fitting with
new ones.
•
Tighten the following:
Torque - Master Cylinder Mounting Screws: 9.8 N·m (1.0
kgf·m, 87 in·lb)
Brake Hose Banjo Bolt: 25 N·m (2.5 kgf·m, 18 ft·lb)
•
Bleed the brake line (see Bleeding the Brake Line).
•
Check the brake for good braking power, no brake drag,
and no fluid leakage.
•
Check the brake pedal position (master cylinder push rod
length).
Front Master Cylinder Disassembly
•
Remove the front master cylinder.
•
Remove the reservoir cap and diaphragm, and pour the
brake fluid into a container.
•
Unscrew the locknut and pivot bolt, and remove the brake
lever.
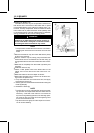
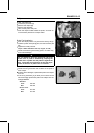
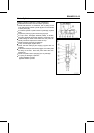
•
Push the dust cover [A] out of place, and remove the cir-
clip [B].
Special Tool - Inside Circlip Pliers: 57001-143
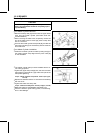
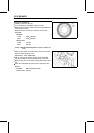
•
Remove the washer [C], pull out the piston [D], primary
cup [F], and return spring [G].
CAUTION
Do not remove the secondary cup [E] from the pis-
ton since removal will damage it.