


3 Alternator -
maintenance and precautions
1
To avoid damage to the alternator, the
following precautions should be observed.
1 Disconnect the leads from the battery
before connecting a mains charger to the
battery terminals.
2 Never stop the engine by pulling off one of
the battery leads.
3 Disconnect the battery if electric welding is
to be carried out on the vehicle.
4 If using booster cables from another battery
to start the car, make sure that they are
connected positive to positive and negative to
negative.
5 Maintenance consists of keeping the
outside of the alternator clean, the electrical
connections secure and the drivebelt correctly
tensioned, see Chapter 2, Section 8.
4 Alternator -
removal and refitting
1
Note: Depending on the model, access to the
alternator from above may be poor in which
case it will be necessary to work from the
underside of the vehicle, through the
right-hand wheel arch (after removing the
roadwheel and the lower undershield). Refer
to Chapter 13 for details.
1 Disconnect the leads from the rear of the
alternator.
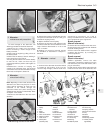
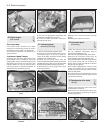
2 Release the mounting and adjuster link nuts
and push the alternator as far as it will go in
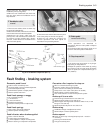
towards the engine (photos).
3 Slip the drivebelt from the pulley.
4 Remove the mounting and adjuster bolts
and lift the alternator from the brackets on the
engine. Remove downwards on 1116 cc and
1301 cc models.
5 Refitting is a reversal of removal, tension
the drivebelt as described in Chapter 2,
Section 8.
5 Alternator - overhaul
3
1 Overhaul of the alternator should be limited
to renewal of the brushes. If the unit has
covered a high mileage, it will be found more
economical to exchange it for a new or
factory-reconditioned one, rather than renew
worn components on the original unit.
Brush renewal
(Marelli alternator)
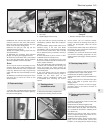
2 Unscrew the nuts and take off the rear cover.
3 Unscrew the two small bolts and withdraw
the brush holder (photos).
4 Fit the new brush holder which is supplied
complete with brushes, by reversing the
removal operations.
Brush renewal
(Bosch alternator)
5 Where applicable, remove the radio
suppression condenser (capacitor) from the
rear end frame (one screw and washer, and a
plug-in connection).
6 Undo the two screws which retain the brush
holder to the rear frame of the alternator, then
Electrical system 9•3
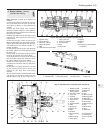
5.3A Alternator brush holder bolt4.2B Alternator adjuster bolt4.2A Alternator mounting
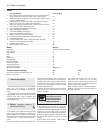
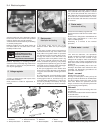
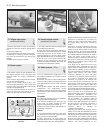
Fig. 9.1 Exploded view of typical alternator (Sec 5)
1 Pulley
2 Fan
3 Bolts
4 Washers
5 Drive-end bracket
6 Stator windings
7 Plate screw
8 Diode plate
(rectifier pack)
9 Body
10 Brush
11 Spring
12 Brush holder
13 Condenser
14 Screws and
washers
15 Screws and
washers
16 Screws and
washers
17 Plug socket
18 Suppressor
19 Shaft nut
20 Spring washer
21 Thrust ring
22 Bearing
23 Retainer plate
24 Thrust ring
25 Spring washer
26 Screw and washer
27 Key
28 Rotor
29 Bearing
30 Backing washer
31 Shield (where
applicable)
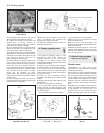
5.3B Removing alternator brush holder
9