


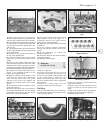
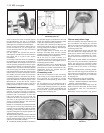
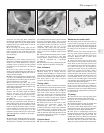
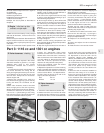
clearance and end gap. Both clearances
should be checked with a feeler gauge. Check
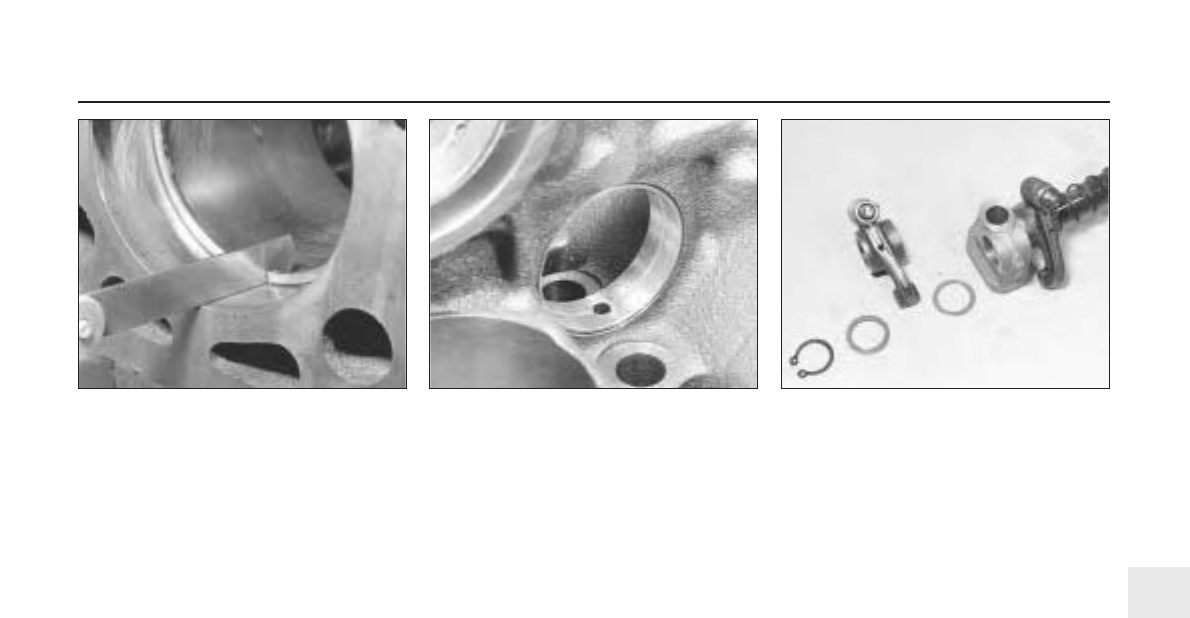
the end gap when the ring has been pushed
squarely down the cylinder bore for two or
three inches (photos).
25 If new rings are being used and the
cylinder bores have not been rebored, always
make sure that the top compression ring has
been stepped to prevent it contacting the
bore wear ridge.
Flywheel
26 Check the clutch mating surface of the
flywheel. If it is deeply scored (due to failure to
renew a worn driven plate) then it may be
possible to have it surface ground provided
the thickness of the flywheel is not reduced
too much.
27 If lots of tiny cracks are visible on the
surface of the flywheel then this will be due to
overheating caused by slipping the clutch or
“riding” the clutch pedal.
28 With a pre-engaged type of starter motor
it is rare to find the teeth of the flywheel ring
gear damaged or worn but if they are, then the
ring gear will have to be renewed.
29 To remove the ring gear, drill a hole
between the roots of two teeth taking care not
to damage the flywheel and then split the ring
with a sharp cold chisel.
30 The new ring gear must be heated to
between 180 and 220ºC (356 and 428ºF)
which is very hot, so if you do not have
facilities for obtaining these temperatures,
leave the job to your dealer or engine
reconditioner.
31 Where such facilities are available, then
the ring gear should be either pressed or
lightly tapped gently onto its register and left
to cool naturally, when the contraction of the
metal on cooling will ensure that it is a secure
and permanent fit. Great care must be taken
not to overheat the ring gear, as if this
happens its temper will be lost. A clutch input
shaft pilot bearing is not fitted on this engine.
Camshaft
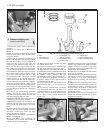
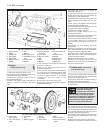
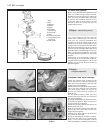
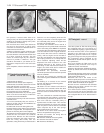
32 Examine the camshaft bearings for wear,
scoring or pitting. If evident then the bearings
will have to be renewed. The three bearings
are of different sizes and they can be removed
and new ones fitted using a bolt, nut and
distance pieces. When drawing a new bearing
into position, make sure that the oil hole is
correctly aligned with the one in the
crankcase. The centre and rear bearings
require reaming after fitting, the bearing at the
timing chain end is supplied ready reamed
(photo).
33 The camshaft itself should show no marks
or scoring on the journal or cam lobe
surfaces. Where evident, renew the camshaft
or have it reprofiled by a specialist
reconditioner.
34 Check the teeth of the camshaft sprocket
for wear. Renew the sprocket if necessary.
Cam followers
35 Examine the bearing surface of the cam
followers which are in contact with the
camshaft. Any indentations or cracks must be
rectified by renewal. Clean sludge and dirt
from the cam followers and check their fit in
their bores. Side to side rock is unusual
except at very high mileage.
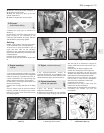
Timing chain
36 Examine the teeth on both the crankshaft
sprocket and the camshaft sprocket for wear.
Each tooth forms an inverted “V” with the
sprocket periphery and if worn, the side of
each tooth under tension will be slightly
concave in shape when compared with the
other side of the tooth, ie; one side of the
inverted “V” will be concave when compared
with the other. If any sign of wear is present
the sprockets must be renewed.
37 Examine the links of the chain for side
slackness and particularly check the
self-tensioning links for freedom of
movement. Renew the chain if any slackness
is noticeable when compared with a new
chain. It is a sensible precaution to renew the
chain at about 60 000 miles (96 000 km) and
at a lesser mileage if the engine is stripped
down for a major overhaul.
Cylinder head
38 This is covered in Section 17.
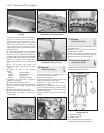
Rockers and rocker shaft
39 Thoroughly clean out the rocker shaft. As
it acts as the oil passages for the valve gear,
clean out the oil holes and make sure they are
quite clear. Check the shaft for straightness
by rolling it on a flat surface. If it is distorted,
renew it.
40 The surface of the shaft should be free
from any wear ridges caused by the rocker
arms. If it is not, the shaft will have to be
renewed. Blocked shaft oil holes often
contribute to such wear.
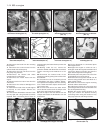
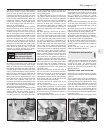
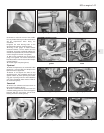
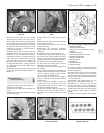
41 Check the rocker arms for wear of the
rocker bushes, for wear at the rocker arm face
which bears on the valve stem, and for wear
of the adjusting ball ended screws. Wear in
the rocker arm bush can be checked by
gripping the rocker arm tip and holding the
rocker arm in place on the shaft, noting if
there is any lateral rocker arm shake. If any
shake is present, and the arm is very loose on
the shaft, remedial action must be taken. It is
recommended that a worn rocker arm be
taken to your local FIAT agent or automobile
engineering works to have the old bush drawn
out and a new bush fitted (photo).
42 Check the tip of the rocker arm where it
bears on the valve head, for cracking or
serious wear on the case hardening. If none is
present the rocker arm may be refitted. Check
the pushrods for straightness by rolling them
on a flat surface.
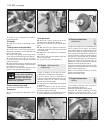
Oil pump
43 Unscrew the four securing bolts which
connect the two halves of the pump body.
44 Clean all the components in a bath of
paraffin and dry them.
45 Inspect the gears for wear or damage and
then check for wear in the following way.
46 Insert a feeler blade between the tooth
peak and the body. This should be between
0.05 and 0.14 mm (0.0019 and 0.0055 in).
47 Now place a straight-edge across the
body flange and check for gear endfloat. This
should be between 0.020 and 0.105 mm
(0.0008 and 0.0041 in). Where the clearances
exceed the specified limits, renew the pump.
48 Check that the oil pressure relief valve
spring is in good condition and not deformed.
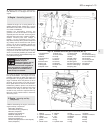
903 cc engine 1•19
18.41 Rocker components18.32 Camshaft bearing18.24B Checking piston ring end gap
1