


fittings are disconnected from the engine and
transmission and positioned out of the way.
Enlist the aid of an assistant to help steady
and guide the power unit down through the
engine compartment as it is removed, If
available, position a suitable engine trolley or
crawler board under the engine/transmission
so that when lowered, the power unit can be
withdrawn from the front end of the vehicle
and moved to the area where it is to be
cleaned and dismantled.
38 Carefully lower the engine and
transmission unit, ensuring that no fittings
become snagged. Detach the hoist and
withdraw the power unit from under the
vehicle.
39 To separate the engine from the
transmission, unbolt and remove the starter
motor, then unscrew the retaining bolts and
withdraw the transmission from the engine. As
it is withdrawn, do not allow the weight of the
engine or transmission to be taken by the
input shaft.
40 To remove the clutch unit, refer to
Chapter 5 for details.
1372 cc Turbo ie
engine/transmission -
removal and separation #
41 The engine and transmission removal and
refitting details for Turbo-engined models are
similar to those described for the non-Turbo
models in the previous sub-Section, but the
following differences should be noted.
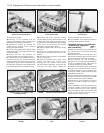
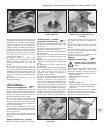
42 To provide access for the disconnection
of the turbo and related components, first
remove the inlet manifold. Removal of the inlet
manifold and the turbocharger is described in
Section 9 of this Chapter.
43 The ignition distributor on the Turbo
engine is driven from the auxiliary shaft and is
mounted at the front of the engine, towards
the timing cover end.
44 The right-hand driveshaft has a steady
bearing and this will need to be unbolted and
detached.
Engine dismantling - general
45 Refer to Chapter 1, Section 14 for details.
Auxiliary shaft - removal,
inspection and refitting #
46 Remove the engine and transmission from
the vehicle as described previously in this
Section part.
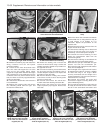
47 Drain the engine oil and remove the sump
as described in Part B of this Section.
48 Remove the oil pump as described in Part
B of this Section.
49 Remove the timing belt and the auxiliary
shaft sprocket as described in Part B of this
Section.
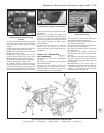
50 Unscrew the three retaining bolts and
remove the auxiliary shaft cover. Remove the
gasket.
51 Withdraw the auxiliary shaft from the
cylinder block.
52 Examine the shaft and its bearing bushes
in the cylinder block for signs of excessive
wear and/or damage and renew it if
necessary. Bush renewal is described in
paragraph 79 in this Section.
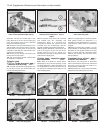
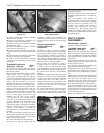
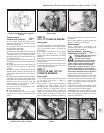
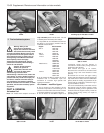
53 The cover gasket and the oil seal should
always be renewed whenever the cover is
removed. To renew the seal, support the
cover on blocks of wood and drive out the old
seal using a suitable drift inserted in the
cut-out in the back of the cover. Clean the
seal location in the housing. Drive the new
seal into place using a suitable metal tube or
socket (photo). The sealing lip must face
towards the cylinder block. Smear the sealing
lips with clean engine oil before installation.
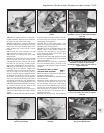
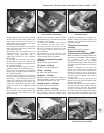
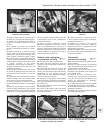
54 Commence refitting by lubricating the
auxiliary shaft journals with clean engine oil,
then insert the shaft into the cylinder block
(photo).
55 Refit the auxiliary shaft cover, using a new
gasket, and tighten the securing bolts
(photos).
56 Refit the auxiliary shaft sprocket, timing
belt, cover and crankshaft pulley as described
in Part B of this Section.
57 Refit the engine and transmission with
reference to Part D of this Section.
Engine -
complete dismantling #
Warning: Refer to the beginning
of Section 9 before starting any
work.
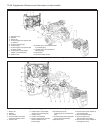
58 Detach and remove the following ancillary
items. Where applicable, refer to the
appropriate Chapter or Section within this
Chapter for more detailed removal instructions.
Engine oil dipstick
Ignition distributor and HT leads
Fuel pump
Alternator
Oil filter
Oil vapour recovery unit
Inlet and exhaust manifolds and associated
fuel injection components (as applicable)
Clutch unit
59 Refer to Part B of this Section for details
and remove the timing cover and drivebelt.
60 Refer to Part B of this Section for details
and remove the cylinder head unit.
Supplement: Revisions and information on later models 13•51
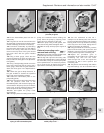
7C.54 Inserting the auxiliary shaft into the
cylinder block (rear timing belt cover
removed)
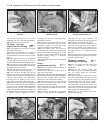
7C.53 Driving a new oil seal into the
auxiliary shaft cover
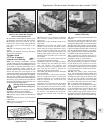
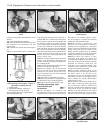
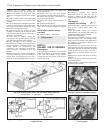
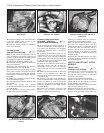
7C.36C Transmission front mounting
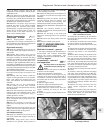
7C.55B . . . and tighten the securing bolts7C.55A Refit the auxiliary shaft cover with
a new gasket . . .
13