


19 Never smear grease on the gasket as,
when the engine heats up, the grease will melt
and may allow compression leaks to develop.
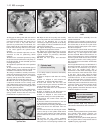
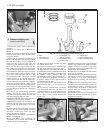
20 The cylinder head gasket cannot be fitted
incorrectly due to its asymmetrical shape, but
the word ALTO should be uppermost in any
event (photo).
21 The locating dowels should be refitted to
the front right and left-hand side cylinder head
securing bolt holes.
22 Carefully fit the cylinder head gasket to
the top of the cylinder block.
23 Lower the cylinder head onto the gasket,
taking care not to move the position of the
gasket.
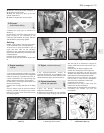
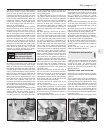
24 Screw in the cylinder head bolts finger
tight, remembering the bolt within the intake
manifold and the metal coolant pipe which is
held by the two cylinder head bolts adjacent to
the coolant temperature sender unit (photos).
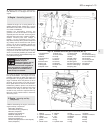
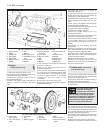
25 Tighten the cylinder head bolts in two
stages, in the specified sequence to the
torque given in Specifications.
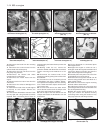
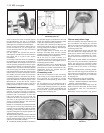
26 With the cylinder head in position, fit the
pushrods in the same order in which they
were removed. Ensure that they locate
properly in the stems of the tappets and
lubricate the pushrod ends before fitment
(photo).
27 Unscrew the rocker arm adjuster screws
as far as they will go.
28 Fit the rocker gear over the four studs in
the cylinder head and lower onto the cylinder
head. Make sure the ball ends of the rockers
locate in the cups of the pushrods.
29 Fit the four nuts and washers to the rocker
shaft pedestal studs and tighten in a
progressive manner to the torque wrench
setting given in the Specifications.
30 Adjust the valve clearances as described
in Section 5.
31 Fit the exhaust manifold, thermostat
housing and alternator, also the rocker cover
(photo).
32 Fit the carburettor, air cleaner and
distributor (Chapter 4).
33 Reconnect all hoses and electrical leads,
including the battery.
34 Refill the cooling system.
8 Sump pan -
removal and refitting
1
1 Drain the engine oil.
2 Unscrew and remove the four nuts and
twelve bolts and lift away the sump pan. If it
has stuck on the gasket carefully tap the side
of the mating flange to break the seal.
Remove the gasket and clean away any
pieces of gasket cement which are adhering
to the flanges.
3 Remove the sealing strips from the
recesses at either end of the sump pan.
Refitting
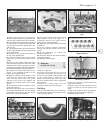
4 Fit the new sealing strips and if necessary,
trim their ends until they are just proud of the
sump pan flange (photo).
5 Using thick grease, stick the gasket side
strips to the crankcase.
6 Apply a blob of jointing compound at the
points of overlap of the side gaskets and
strips.
7 Offer up the sump pan, screw in and tighten
the bolts and nuts progressively (photos).
8 Refill the engine with oil.
903 cc engine 1•11
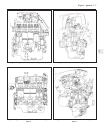
7.24B Cylinder head bolts holding coolant
pipe
7.24A Cylinder head bolt in intake manifold7.20 Cylinder head gasket
7.31 Fitting the rocker cover
7.26 Fitting a pushrod
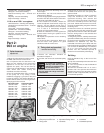
Fig. 1.7 Cylinder head bolt tightening
sequence (Sec 7)
1
8.4 Sump pan sealing strip 8.7A Fitting the sump pan