


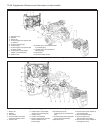

61 Refer to Part B of this Section for details
and remove the flywheel.
62 Refer to the previous sub-Section for
details and remove the auxiliary shaft.
63 Refer to Part B of this Section for details
and remove the sump.
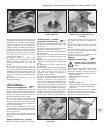
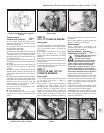
64 Refer to Part B of this Section for details
and remove the oil pump unit.
65 Refer to Part B of this Section for details
and remove the front and rear crankshaft oil
seals.
66 Refer to Part B of this Section and remove
the piston/connecting rod assemblies.
67 Refer to Part B of this Section for details
and remove the crankshaft and main bearing
assemblies.
Crankshaft and main
bearings - removal #
68 Unscrew the securing bolts and remove
the front and rear crankshaft oil seal housings.
Recover the gaskets.
69 Check the main bearing caps for identifi-
cation marks and if necessary use a
centre-punch to identify them. Normally the
caps have identifying notches cut into their
top face nearest the timing belt end of the
engine, with the exception of No 5 cap
(flywheel end) which has no marking (photo).
70 Before removing the crankshaft, check
that the endfloat is within the specified limits.
Ideally a dial gauge should be used, but
alternatively feeler gauges can be used as
follows. Push the crankshaft as far as possible
towards the timing end of the engine, and
using a feeler gauge, measure the gap
between the rear face of the flywheel
mounting flange on the crankshaft and the
outer face of the thrust washer (photo). Now
push the crankshaft as far as possible in the
opposite direction and take the same
measurement again. The difference between
the two measurements is the crankshaft
endfloat. If the endfloat is outside the
specified limits, new thrustwashers will be
required.
71 Unscrew the bolts and tap off the main
bearing caps complete with bearing shells. If
the bearing shells are to be re-used, tape
them to their respective caps.
72 Lift the crankshaft from the crankcase.
73 Extract the bearing shells from the
crankcase, keeping them identified for
location if they are to be re-used, and recover
the thrust washers from No. 5 main bearing
location.
Engine components -
examination and
renovation #
74 With the engine completely stripped,
clean all the components and examine them
for wear. Each part should be checked and
where necessary renewed or renovated as
described elsewhere in this Section. Renew
main and big-end bearing shells as a matter of
course, unless it is known that they have had
little wear and are in perfect condition.
75 If in doubt as to whether to renew a
component which is still just serviceable,
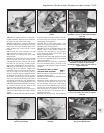
consider the time and effort which will be
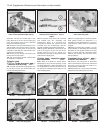
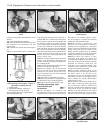
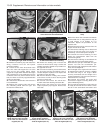
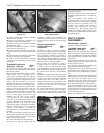
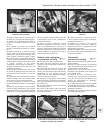
incurred should the component fail at an early
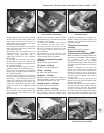
date. Obviously the age and expected life of
the vehicle must influence the standards
applied.
76 Gaskets, oil seals and O-rings must all be
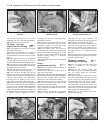
renewed as a matter of course. FIAT specify
that the main cylinder head bolts should be
renewed after they have been used (ie
tightened) four times - if in any doubt as to the
number of times the bolts have been used,
renew them in any case as a precaution
against possible failure.
77 Take the opportunity to renew the engine
core plugs while they are easily accessible.
Knock out the old plugs with a hammer and
chisel or punch. Clean the plug seats, smear
the new plugs with sealant and tap them
squarely into position.
78 Clean and examine the cylinder block as
described in paragraphs 2 to 7 of Section 18,
Chapter 1.
79 If the auxiliary shaft bushes are
excessively worn or are oval, they must be
renewed. When the new bushes are installed,
they may need to be reamed to suit. The
renewal of the auxiliary shaft bushes is
therefore best entrusted to an engine
reconditioner or FIAT dealer. When the
bushes are renewed, ensure that the oil hole
in each bush is aligned with the oil channel in
the cylinder block.
PART D: ENGINE
REASSEMBLY
Reassembly - general
1 Refer to Chapter 1, Section 19.
Crankshaft and main
bearings - refitting #
2 Ensure that the crankcase and crankshaft
are thoroughly clean, and that the oilways are
clear. If possible, blow through the oil drillings
with compressed air, and inject clean engine
oil into them.
3 Unless they are virtually new, the old main
bearing shells should be renewed. Failure to
do so is a false economy.
4 If new bearing shells are being fitted, wipe
away all traces of protective grease.
5 Note that there is a tag on the back of each
bearing shell, which engages with a groove in
the relevant seat in the crankcase or bearing
cap.
6 Wipe clean the bearing shell locations in the
crankcase with a non-fluffy rag, then lubricate
them and fit the five upper halves of the
bearing shells to their seats. Note that the
centre (No. 3) bearing shell is plain, whereas
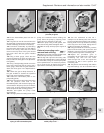
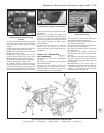
all the other shells have oil grooves (photos).
7 Fit the thrustwashers to the No. 5 main
bearing shell location, with the grooved side
of each washer facing away from the face of
the cylinder block - ie towards the thrust face
of the crankshaft (photos).
8 Wipe the bearing shell locations in the
13•52 Supplement: Revisions and information on later models
7D.6B . . . all others have oil groove7D.6A No. 3 main bearing shell is plain . . .
7C.70 Measuring crankshaft endfloat using
feeler gauge method
7C.69 Identification notches on No. 3 main
bearing cap