


assembly and the flexible pipe, particularly the
fixing bracket and union at the car end of the
flexible pipe.
3 Have ready a container suitable to catch
the brake fluid, and sheets of clean
newspaper on which to put parts.
4 Take out the spring clips and locking
blocks, and take the caliper off the support
bracket.
5 Disconnect the hydraulic flexible pipe at the
under wing support bracket and cap both
pipe ends. It may help to prevent loss of fluid
if the vent in the reservoir cap is sealed with
adhesive tape, to create a vacuum.
6 Remove the caliper to the bench or other
work surface, and clean it thoroughly with
hydraulic fluid or methylated spirit.
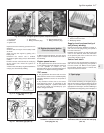
7 Depress the piston until the dust excluding
boot can be removed.
8 Now apply air pressure to the flexible hose
and eject the piston. Quite a low pressure is
required for this, such as can be generated
with a hand or foot operated pump.
9 Pick out the piston seal from its groove in
the cylinder. Use a sharp probe, but take care
to avoid scratching the cylinder bore.
10 Examine the surface of the piston and
cylinder bore. If either is corroded, scored or
shows metal-to-metal rubbed areas, the
complete assembly should be renewed.
11 If the components are in good condition,
discard the oil seals, clean the piston and
cylinder and fit the new seal for the piston.
This is included in the repair kit. Use the
fingers only to manipulate it into its groove.
12 Lubricate the piston with clean hydraulic
fluid and insert it partially into the cylinder.
13 Fit the new dust excluding boot to its
projecting end, push the piston fully into the
cylinder and engage the dust excluder with
the rim of the cylinder.
14 Refit the caliper, reconnect the flexible
hose, then bleed the front hydraulic circuit
(refer to Section 12).
6 Brake disc - inspection,
renovation or renewal
2
1 Whenever the front disc pads are being
checked for wear, take the opportunity to
inspect the discs for deep scoring or
grooving. After a high mileage the disc may
become reduced in thickness away from the
extreme outer edge of the disc. lf this wear is
rapid, it is possible that the friction pads are of
too hard a type.
2 If the disc has evidence of many tiny cracks,
these may be caused by overheating due to a
seized caliper piston in the “applied” position.
3 The foregoing conditions may be corrected
by regrinding the disc provided that the
thickness of the disc is not reduced below
that specified by such action. Alternatively, fit
a new disc.
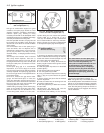
4 To remove a disc, take off the caliper and
pads as described in Sections 3 and 5. Tie the
caliper up, out of the way.
5 Knock back the tabs of the lockplates and
unbolt the caliper support bracket from the
hub carrier.
6 Unscrew and remove the two bolts which
hold the disc assembly to the hub. One of
these bolts is for wheel locating purposes.
7 Pull the disc from the hub.
8 Refitting is a reversal of the removal
process. If the disc has excessive run-out,
repositioning it in relation to the hub may
bring it within tolerance by cancelling out the
run-out characteristics in the hub and disc,
once the most suitable fitted position has
been found.
7 Rear wheel cylinder -
removal, overhaul and refitting
4
Note: Purchase a repair kit in advance of
overhaul.
1 If fluid seepage is observed from the ends
of the rear wheel cylinder when the brake
drum has been removed, the seals are leaking
and immediate action must be taken.
2 Although the cylinder can be dismantled
without taking it from the backplate, this is not
recommended due to the possibility of under
wing dirt and mud dropping onto the
components as work proceeds.
3 Remove the brake shoes, as described in
Section 4.
4 Disconnect the hydraulic line from the
wheel cylinder and cap the open end of the
pipe. lt may help to reduce the loss of fluid if
the vent hole in the reservoir cap is taped over
to create a vacuum.
5 Unscrew and remove the setscrews which
hold the cylinder to the backplate and
withdraw the cylinder. Prise off the rubber
dust excluding boots.
6 Apply gentle air pressure from a hand or
foot operated pump to eject the pistons and
spring. Alternatively, tap the end of the
cylinder on a piece of hardwood and the
pistons should move out.
7 Inspect the piston and cylinder bore
surfaces for scoring, corrosion or evidence of
metal-to-metal rubbing areas. lf these are
found, discard the assembly and purchase a
new one.
8 If the components are in good condition,
note which way round the lips are fitted, then
discard the seals and boots and wash the
pistons and cylinder bore in clean hydraulic
fluid or methylated spirit.
9 Manipulate the new seals into position,
using the fingers only for this job.
10 Dip the pistons in clean hydraulic fluid and
insert them with the coil spring and washers
into the cylinder.
11 Fit the new dust excluding boots.
12 Refit the wheel cylinder to the backplate,
reconnect the hydraulic pipe, then refit the
shoes, the drum and the roadwheel.
13 Bleed the rear hydraulic circuit as
described in Section 12.
8 Brake drum - inspection,
renovation or renewal
2
1 Whenever the rear brake linings are being
checked for wear, take the opportunity to
inspect the internal surfaces of the brake
drums.
2 If the drums are grooved or deeply scored,
they may be reground, provided that their new
internal diameter will not then exceed the
specified dimension. If it will, or the drum is
cracked, it must be renewed.
3 Removal and refitting of a brake drum is
described in Section 4.
8•4 Braking system
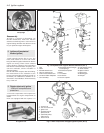
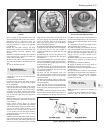
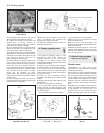
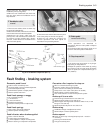
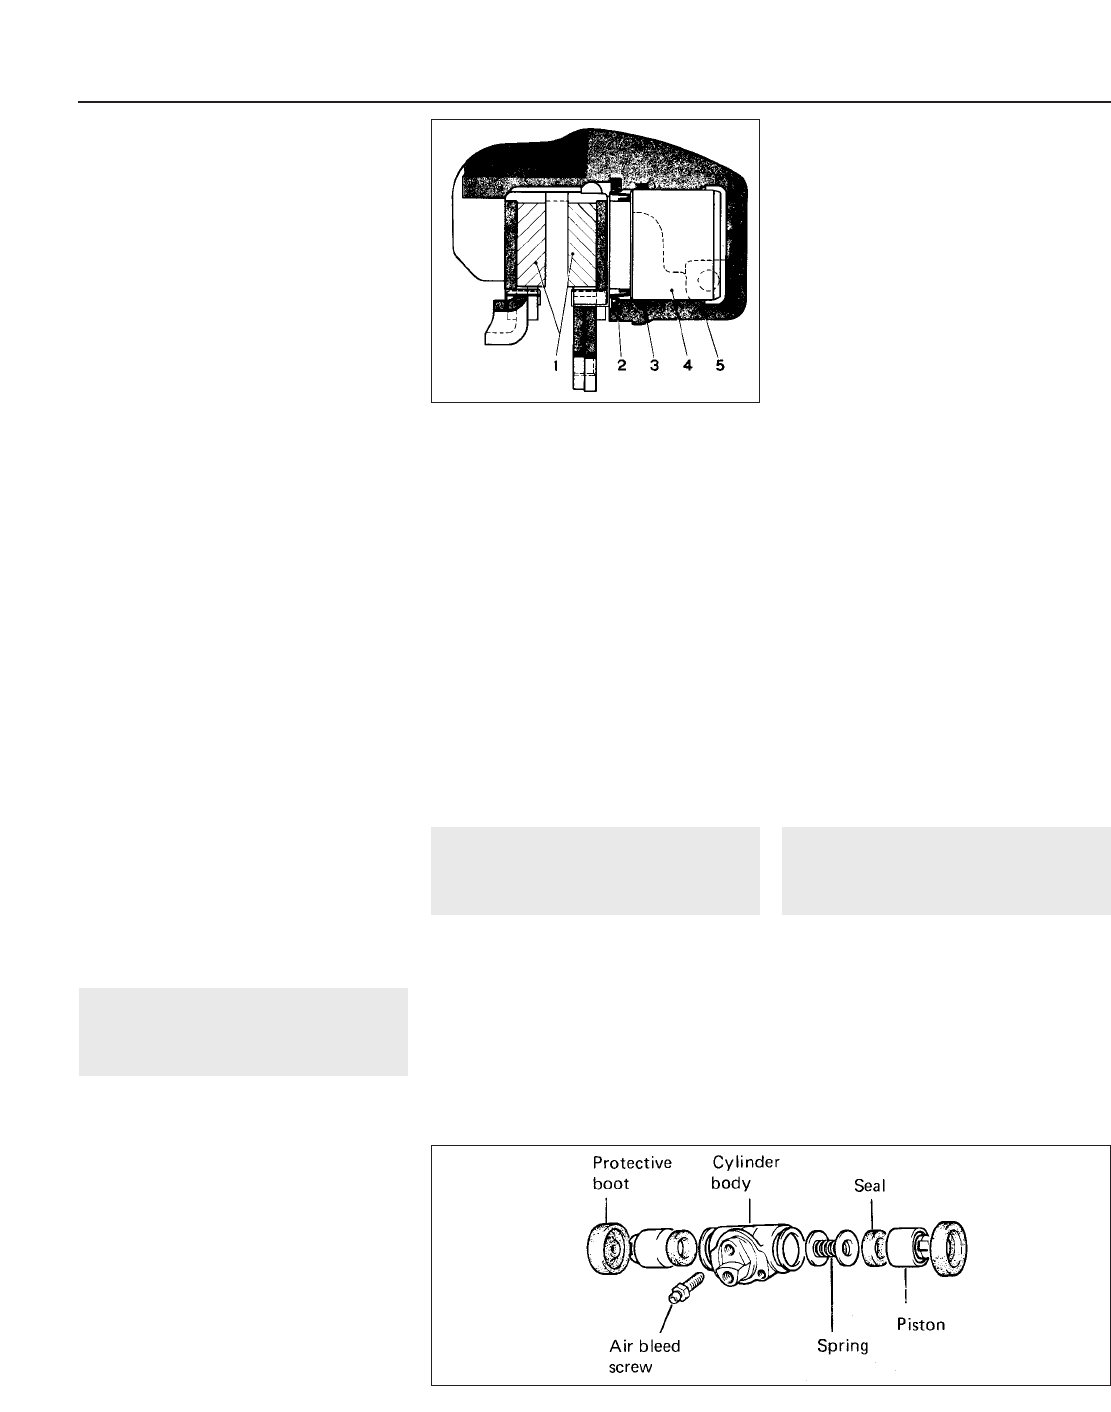
Fig. 8.4 Exploded view of a rear wheel cylinder (Sec 7)
1 Pads
2 Dust excluder
3 Piston seal
4 Piston
5 Cylinder body
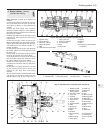
Fig. 8.3 Sectional view of caliper (Sec 5)