


inhibitor should be used. Again, a reputable
make giving full protection must be chosen
and renewed every two years. Inhibitors with
dyes are useful for finding leaks, and on some
makes the dye shows when the inhibiting
ability is finished.
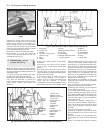
4 Thermostat -
removal, testing and refitting
1
1 The thermostat assembly is mounted on the
flywheel end of the cylinder block.
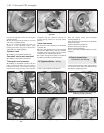
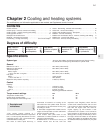
2 Unfortunately, the thermostat/housing is a
complete unit and failure of the thermostat will
necessitate the purchase of the complete
component (photo).
3 If the thermostat/housing is removed from
the engine, it can be suspended in water and
the water heated to check out its opening
temperature. Movement of the thermostat
valve can be observed to some extent
through the openings in the housing.
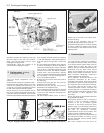
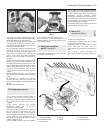
4 When refitting, always use a new gasket at
its mounting face (photo).
5 Radiator fan thermostatic
switch - removal, checking
and refitting
1
1 Drain the cooling system.
2 If the thermostatic switch is being removed
because the fan is not operating and the
switch is suspect, check the fan fuse first,
before removing the switch.
3 To remove the switch, disconnect the leads
from the terminals and unscrew the switch.
4 Connect a test bulb and battery across the
switch terminals and then immerse the
sensing part of the switch in a container of
water. Heat the water and, using a
thermometer, check the temperature of the
water when the bulb lights up, indicating the
switch is functioning. The switch should
operate at approximately 194ºF (90ºC). Allow
the water to cool and check that the switch
cuts out at 185ºF (85ºC). Renew a faulty
switch.
5 Refitting of the switch is the reverse of the
removal procedure. Always fit a new O-ring on
the switch.
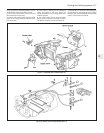
6 Radiator fan -
removal and refitting
1
1 Disconnect the electrical leads from the
radiator fan motor.
2 Unbolt the fan mounting struts from the
radiator and lift the complete assembly away.
3 Refitting is a reversal of removal.
7 Radiator -
removal and refitting
1
1 Drain the cooling system.
2 Disconnect the electrical leads from the
radiator fan motor and thermostatic switch.
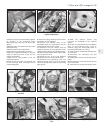
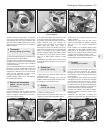
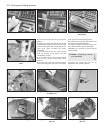
3 Disconnect the coolant hoses from the
radiator (photos).
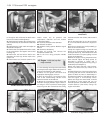
4 Release the clips from the top of the
radiator and withdraw the radiator complete
with fan from the engine compartment
(photos).
5 The radiator is of combined plastic/metal
construction and any repair should be left to
specialists. In an emergency however, minor
leaks from the radiator may be cured by using
a radiator sealant with the radiator in situ.
6 Refitting is a reversal of removal. Fill the
cooling system as described in Section 2.
8 Drivebelt -
tensioning and renewal
1
1 The drivebelt for the alternator and coolant
pump is correctly tensioned if it deflects
through 10.0 mm (0.39 in) under moderate
thumb pressure at the mid point of the longest
run of the belt.
2 To tighten the belt, release the mounting
and adjuster nuts on the alternator and prise
the alternator away from the engine. Tighten
the nuts when the belt is taut and then
re-check the tension as previously described.
Never over-tension a belt or the coolant pump
or alternator bearings may be damaged.
3 Check the condition of the belt at regular
intervals. If frayed or cracked, renew it in the
following way.
4 Release the alternator mounting and
adjuster nuts and push the alternator fully in
Cooling and heating systems 2•3
7.3A Radiator top hose4.4 Fitting thermostat housing
(1116 cc engine)
4.2 Thermostat housing
7.4B Removing radiator/fan assembly7.4A Radiator fixing clip7.3B Radiator hose to thermostat housing
2