


Sump pan -
removal and refitting ¡
60 Drain the engine oil.
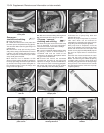
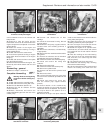
61 Unbolt and remove the cover plate from
the lower part of the flywheel housing (photo).
The two lower bolts retain the gearchange rod
support strut.
62 Unscrew the sump pan securing screws
and pull the sump pan downwards to remove
it (photo). The joint sealant will require cutting
with a sharp knife to release the pan. Clean
away all old gasket material.
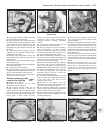
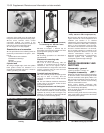
63 A bead 3.0 mm in diameter of RTV
silicone instant gasket should be applied to
the sump pan flange and then the pan offered
up. Screw in the fixing screws and tighten to
the specified torque. Note the flange end
fixing screw nuts (photos).
64 Wait one hour before filling with engine oil.
65 Refit the flywheel housing cover plate.
Oil pump - removal,
checking and refitting #
66 Drain the engine oil and remove the sump
pan as described in the last sub-Section.
Unscrew and remove the oil filter cartridge.
67 Remove the timing belt.
68 Lock the crankshaft against rotation either
by placing a block of wood between a
crankshaft web and the inside of the
crankcase or by jamming the flywheel starter
ring gear with a suitable tool.
69 Unscrew and remove the crankshaft
sprocket bolt and take off the timing belt
sprocket. If it is tight, use two screwdrivers to
lever it off or use a two- or three-legged puller.
70 Unbolt and remove the oil pick-up/filter
screen assembly. Note the sealing washer.
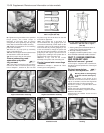
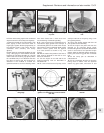
71 Extract the oil pump fixing bolts and
withdraw the pump.
72 The oil pump incorporates a pressure
relief valve which can be removed for
examination by depressing the spring plunger
and pulling out the keeper plate (photos).
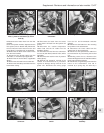
73 If pump wear is suspected, check the
gears in the following way. Extract the fixing
screws and remove the rear cover plate. The
screws are very tight and will probably require
the use of an impact driver to release them
(photo).
74 Check the clearance between the outer
gear and the pump housing using feeler
blades, and also the gear endfloat by placing
a straight-edge across the pump body and
checking the gap between the straight-edge
and gear face. If the clearances are outside
the specified tolerance, renew the oil pump
complete (photos).
13•24 Supplement: Revisions and information on later models
5B.74B Checking the oil pump gear
endfloat
5B.74A Checking the oil pump gear-to-
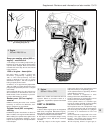
housing clearance
5B.73 Removing the oil pump rear cover
plate screws
5B.72B Oil pump relief valve components5B.72A Removing the oil pump relief valve
keeper plate
5B.63B Sump pan flange end fixing screw
and nut
5B.63A Tightening a sump pan screw5B.62 Removing the sump pan5B.61 Removing the flywheel housing
cover plate