


2 The big-end bearing shells can be renewed
without having to remove the cylinder head if
the caps are unbolted and the
piston/connecting rod pushed gently about
one inch up the bore (the crankpin being at its
lowest point). If these shells are worn,
however, the main bearing shells will almost
certainly be worn as well. In this case, the
engine should be removed for complete
overhaul including crankshaft removal.
3 To remove the piston/connecting rods,
remove the cylinder head as described in
Section 29.
4 Grip the oil pick-up pipe and twist or rock it
from its hole in the crankcase. It is an
interference fit in the hole.
5 Unscrew the nuts from the big-end caps,
then remove the caps with their bearing
shells. The caps and their connecting rods are
numbered 1, 2, 3 and 4 from the timing cover
end of the engine. The numbers are adjacent
at the big-end cap joint and on the side of the
crankcase furthest from the auxiliary shaft.
6 If the bearing shells are to be used again,
tape them to their respective big-end caps.
7 Push each connecting rod/piston assembly
up the bore and out of the cylinder block.
There is one reservation; if a wear ridge has
developed at the top of the bores, remove this
by careful scraping before trying to remove
the piston/rod assemblies. The ridge will
otherwise prevent removal or break the piston
rings during the attempt.
8 If the connecting rod bearing shells are to
be used again, tape the shells to their
respective rods.
9 Dismantling the piston/connecting rod is
described in Section 18.
Refitting
10 Fit the new shells into the connecting rod
and caps, ensuring the surfaces on which the
shells seat, are clean and dry.
11 Check that the piston ring gaps are evenly
spaced at 120º intervals. Liberally oil the rings
and the cylinder bores.
12 Fit a piston ring clamp to compress the
rings.
13 Insert the piston/connecting rod into the
cylinder bore, checking that the rod assembly
is correct for that particular bore. The cap and
rod matching numbers must be furthest away
from the auxiliary shaft (Fig. 1.31).
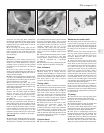
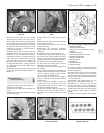
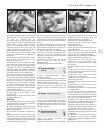
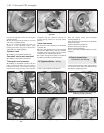
14 Push the piston into the bore until the
piston ring clamp is against the cylinder block
and then tap the crown of the piston lightly to
push it out of the ring clamp and into the bore
(photo).
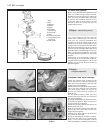
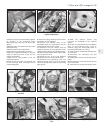
15 Oil the crankshaft journal and fit the
big-end of the connecting rod to the journal.
Fit the big-end cap and nuts, checking that
the cap is the right way round (photo).
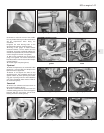
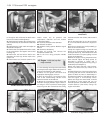
16 Tighten the big-end nuts to the specified
torque. The correct torque is important as the
nuts have no locking arrangement. After
tightening each big-end, check the crankshaft
rotates smoothly (photo).
17 Refit the oil pick-up pipe, the cylinder
head, oil pump and sump pan, all as
described earlier.
18 Refill the engine with oil and coolant.
33 Engine mountings -
renewal
1
1 Three engine/transmission flexible
mountings are used.
2 To renew a mounting, support the weight of
the engine/transmission on a hoist or jack and
unbolt and remove the mounting.
3 In the unlikely event of all three mountings
requiring renewal at the same time, only
disconnect them and renew them one at a
time.
34 Engine - method of removal
1 The engine complete with transmission
should be removed by lowering it to the floor
and withdrawing it from under the front of the
car which will have been raised to provide
adequate clearance.
35 Engine/transmission -
removal and separation
3
1 Open the bonnet, disconnect the
windscreen washer tube.
2 Mark the hinge positions on the underside
of the bonnet and then with the help of an
assistant to support its weight unbolt and
remove the bonnet to a safe place.
3 Disconnect the battery negative lead.
4 Drain the cooling system and the engine
and transmission oils.
5 Remove the air cleaner.
6 From the rear of the alternator disconnect
the electrical leads.
7 Disconnect the leads from the starter
motor, oil pressure and coolant temperature
switches, also the oil temperature switch.
8 Disconnect the LT lead from the distributor
and the HT lead from the ignition coil.
9 Disconnect the clutch cable from the
release lever at the transmission. Also
disconnect the speedometer drive cable
(knurled ring).
10 Pull the leads from the reversing lamp
switch.
11 Disconnect all coolant hoses from the
engine. Also disconnect the brake servo hose
from the intake manifold.
12 Disconnect the choke and throttle
controls from the carburettor.
13 Disconnect the inlet hose from the fuel
pump and plug the hose.
14 Disconnect the fuel return hose from the
carburettor.
15 Disconnect the coolant hoses from the
carburettor throttle block.
16 Raise the front of the car and remove the
front roadwheels.
17 Unscrew and remove the driveshaft to
hub nuts. These are very tight and a long
knuckle bar will be required when unscrewing
them. Have an assistant apply the brake pedal
hard to prevent the hub from turning.
18 Working under the car, remove the inner
wing protective shields and then disconnect
the exhaust downpipe from the manifold.
19 Disconnect the exhaust pipe sections by
removing the socket clamp just forward of the
rear axle beam. Remove the front section.
20 Disconnect the forward ends of the
gearchange rods by prising their sockets from
the ballstuds.
21 Unscrew the nuts on the steering tie-rod
end balljoints and then using a suitable
“splitter” tool, separate the balljoints from the
steering arms.
22 Unbolt the front brake hose support clips
1116 cc and 1301 cc engine 1•27
32.16 Tightening a big-end cap nut32.15 Fitting a big-end cap32.14 Fitting piston into cylinder bore
1