


thumb and forefinger at the centre of the run
between the auxiliary shaft sprocket and the
camshaft sprocket. Using this method it
should just be possible to twist the belt
through 90º using moderate pressure.
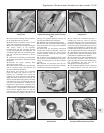
55 To adjust the tension, loosen off the
tensioner pulley nut then insert two rods (or
screwdrivers) into position in the pulley holes
and position a lever between them.
56 Gently lever the tensioner pulley in the
required direction to set the tension as
described, then initially tighten the pulley nut
to lock the tensioner in the required position.
57 Remove the tools from the tensioner,
recheck the tension and then tighten the
tensioner pulley nut securely.
58 Rotate the crankshaft clockwise through
two complete turns using a socket or spanner
on the crankshaft pulley nut, then recheck the
belt tension. To avoid the possibility of
unscrewing the pulley nut, remove the spark
plugs to enable the engine to be turned over
easier.
59 If further adjustment is required, repeat
the previously mentioned procedures. If in
doubt, err on the slightly tight side when
adjusting the tension. If the belt is set too
loose, it may jump off the sprockets resulting
in serious damage.
60 Remove the crankshaft pulley retaining
nut, fit the timing belt cover, then refit and
tighten the pulley nut to the specified torque
setting.
61 Refit the remaining components in the
reverse order of removal. Tighten the retaining
nuts/bolts to the specified torque settings
where given. Adjust the tension of the
alternator drivebelt as described in Section 8.
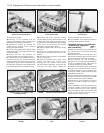
Adjustment using FIAT special
tools
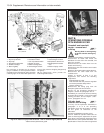
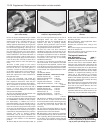
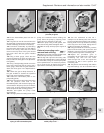
62 Assemble the special tools and fit them to
the belt tensioner pulley as shown in
Fig. 13.16. When fitted, the tool rod must be
as vertical as possible and it is important to
note that no sliding weights must be attached
to tool No. 1860745100.
63 Slacken the tensioner pulley nut, if not
already done. Rotate the crankshaft clockwise
through two complete turns using a socket or
spanner on the crankshaft pulley nut. The
special tool rod may move from the vertical as
the engine is turned over, in which case the
joint will need to be re-adjusted to return the
rod to the vertical and the operation repeated.
64 With the two revolutions of the crankshaft
completed, tighten the belt tensioner pulley
nut securely and remove the special tools.
65 Remove the crankshaft pulley retaining
nut, fit the timing belt cover, then refit and
tighten the pulley nut to its specified torque
setting.
66 Refit the remaining components in the
reverse order of removal. Tighten the retaining
nuts/bolts to the specified torque settings
where given. Adjust the tension of the
alternator drivebelt as described in Sec-
tion 8.
Camshaft front oil seal -
renewal #
67 The camshaft front oil seal may be
renewed with the engine in the vehicle, and
the camshaft in situ, as follows.
68 Remove the timing belt and the camshaft
sprocket as described previously in this
Section.
69 Punch or drill a small hole in the centre of
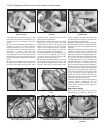
the exposed oil seal. Screw in a self-tapping
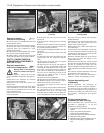
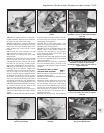
screw, and pull on the screw with pliers to
extract the seal.
70 Clean the oil seal seat with a wooden or
plastic scraper.
71 Lubricate the lips of the new seal with
clean engine oil, and drive it into position until
it is flush with the housing, using a suitable
socket or tube. Take care not to damage the
seal lips during fitting. Note that the seal lips
should face inwards.
72 Refit the camshaft sprocket and the
timing belt as described previously in this
Section.
Camshaft, housing and
followers -
removal and refitting #
Note: The engine must be cold when
removing the camshaft housing. Do not
remove the camshaft housing from a hot
engine. New camshaft housing and camshaft
cover gaskets must be used on refitting.
73 If the engine is still in the vehicle,
disconnect the battery negative lead.
74 Refer to paragraphs 3 to 7 in this part of
this Section for details and remove the
camshaft cover.
75 Remove the camshaft sprocket and timing
belt as described previously in this Section.
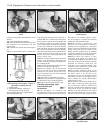
76 Remove the three securing nuts and the
single securing bolt, and withdraw the upper
section of the rear timing belt cover.
77 Unscrew the camshaft housing securing
bolts. There are seven bolts which are
accessible from outside the camshaft
housing, and five shorter bolts which are
accessible from inside the housing (these
bolts are normally covered by the camshaft
cover). Note that each bolt is fitted with two
washers (photo).
78 Carefully lift the camshaft housing from
the cylinder head. Be prepared for the cam
followers to drop from their bores in the
camshaft housing as the camshaft housing is
lifted, and ensure that the cam followers are
identified for position so that they can be
refitted in their original positions (this can be
achieved by placing each cam follower over
its relevant valve in the cylinder head).
Supplement: Revisions and information on later models 13•41
Fig. 13.16 FIAT special tool No. 1860745100 (A) for timing belt adjustment shown fitted to
the tensioner pulley - 1372 cc ie and Turbo ie engines (Sec 7B)
Use with adapter No. 1860745200 on 1372 cc ie engines and No. 1860745300 on 1372 cc
Turbo ie engines
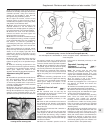
7B.77 Removing one of the camshaft
housing shorter securing bolts
13