


CLUTCH 5- 7
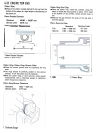
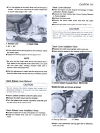
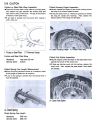
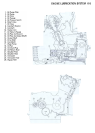
0 When install the spring plate. align the marks on the hub
and the plate.
A. Marks
9. Steel Plate
10. Washer
11. Hub Nut
12. Pusher
13. Bearing
14. Spring Plate
15. Clutch Spring
16. Retainer
O Tighten the clutch spring bolts to the specified torque
(see Exploded View). .
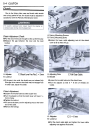
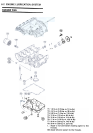
1 .Spacer
2. Needle Bearing
3. Collar
4. Clutch Housing
5. Washer
6. Clutch Hub
7. Clutch Cam
8. Friction Plate
Friction Plate Wear, Damage Inspection
.Visually inspect the friction plates to see if they show
any signs of seizure, overheating, or uneven wear.
* If any plates show signs of damage, replace the friction
plates and steel plates as a set.
.Measure the thickness of the friction plates at several
points (see Specifications).
*If any of the measurements is less than the service limit,
replace the friction plate.
O Install the spacer with the chamfered side facing
inwards.
0 Install the clutch cam on the clutch hub.
0 Discard the used hub nut, and install a new nut.
0 Install the clutch holder (special tool: 57001 -1243) to
keep the clutch hub from turning and tighten the clutch
hub nut to the specified torque (see Exploded View).
0 Install the friction plates and steel plates, starting with a
friction plate and alternating them.
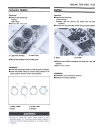
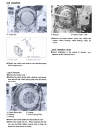
0 Install the last friction plate fitting the tangs in the
groove on the housing as shown.
1 .Last Friction Plate
OApply molybdenum disulfide grease to the pusher end
and ball bearing.
Friction Plate Thickness
Standard: 2.7 -2.9 mm
Service Limit: 2.5 mm