


15-16 ELECTRICAL SYSTEM
.Repeat the above three steps for other two yellow leads
(in connector 2 which leads to the regulator/rectifier) ) .
*Replace the regulator/rectifier if the bulb does not light
as described above.
Ignition System
NOTE
0 The above test is not foolproof. If the above checks
show the regulator/rectifier is not damaged, but there is
still trouble in the charging system, first carefully inspect
the alternator, battery, wiring, and all connections.
Replace the regulator/rectifier if all these other
components turn out good.
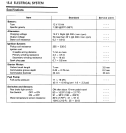
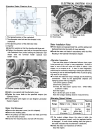
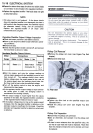
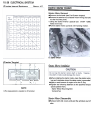
Regulator/Rectifier Output Voltage Inspection
.Check the battery condition (see Battery section).
.Warm up the engine to obtain actual alternator operat-
ing conditions.
.Remove the seat.
.Check that the ignition switch is turned off, and connect
the hand tester as shown in table.
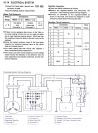
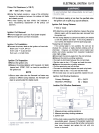
Regulator /Rectifier OutputNoItage
Meter
Range
Connections
Reading
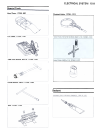
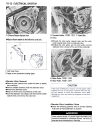
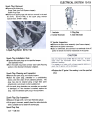
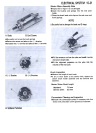
Pickup Coil Removal
.Remove the pickup coil cover (see Engine Top End
chapter).
.Remove the Allen bolt.
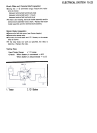
Meter (+) to
Meter ( -) to
Battery
Voltage -
14 -
15 V
25 V DC
Battery ( +) Black/Yellow
(Connector 5)
A. Allen Bolt
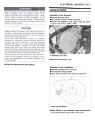
.Start the engine, and note the voltage readings at
various engine speeds with the headlight turned on and
then turned off. The readings should show nearly
battery voltage when the engine speed is low, and, as
the engine speed rises, the readings should also rise.
But they must be kept under the specified voltage.
.Turn off the ignition switch to stop the engine, and
disconnect the hand tester.
*If the regulator/rectifier output voltage is kept between
the values given in table, the charging system is
considered to be working normally.
*If the output voltage is much higher than the values
specified in the table, the regulator/rectifier is defective
or the regulator/rectifier leads are loose or open.
*If the battery voltage does not rise as the engine speed
increases, then the regulator/rectifier is defective or the
alternator output is insufficient for the loads. Check the
alternator and regulator/rectifier to detennine which part
is defective.
! nsta!!ation
.Tighten the Allen bolt to the specified torque (see
Exploded View) .
.'nstall the pickup coil cover (see Engine Top End
chapter) .
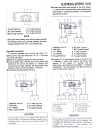
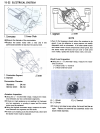
Pickup Coil Inspection
.Disconnect the pickup coil connector.
.Zero an ohmmeter, and connect it to the pickup coil
leads.
* If there is more resistance than the specified value, the
coil has an open lead and must be replaced. Much less
than this resistance means the coil is shorted, and must
be replaced.