


4 - FLIGHT PLANS
76
190-00357-00 Rev E
Points to remember with Parallel Track:
• Youmusthaveanactiveightplan
• Thecurrentlegmustsupportparalleltrack
• Paralleltrackisnotallowedfortheactivelegofan
approach
• Paralleltrackisnotallowediftheactivelegisnota
track-to-fix or direct-to-fix leg
• Paralleltrackmaybeallowedbutnottheselected
offset distance
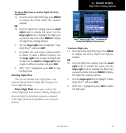
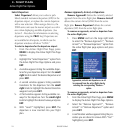
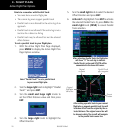
To set a parallel track to your flight plan.
1. With the Active Flight Plan Page displayed,
press MENU to display the Active Flight Plan
Page Options window.
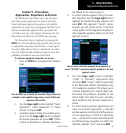
Select “Parallel Track?” to set a parallel track
to your current flight plan.
2. Turn the large right knob to highlight “Parallel
Track?” and press ENT.
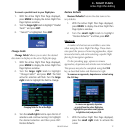
3. Turn the small and large right knobs to
set the Offset Distance value and then press
ENT.
4. Turn the large right knob to highlight the
Offset Direction.
5. Turn the small right knob to select the desired
Offset Direction and press ENT.
6. Activate? is highlighted. Press ENT to activate
the selected Parallel Track. Or, press CLR or the
small right knob (CRSR) to cancel Parallel
Track selection.
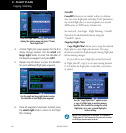
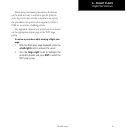
After activating Parallel Track, the flight plan
will show “-P” for each leg to indicate
Parallel Track is active and GPS-PTK will be
annunciated in the lower left corner.
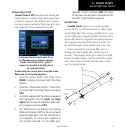
After setting a parallel track to your current
flight plan, a magenta parallel track line will
be drawn offset from the original by the se-
lected distance. The original course line will
be drawn in white. The aircraft will navigate
to the parallel track course line.
Original
flight plan
course line
Parallel Track
offset waypoint
Present
Position
Original
waypoint
Active Flight Plan Options