


Reference Manual
00809-0100-4832, Rev AA
October 2004
5-5
Rosemount 3095FC
REPLACING THE
BATTERIES
The battery pack contains three D-size lead-acid batteries providing 2.5
Amp-hours of current at 6.2 volts nominal.
NOTE
When installing equipment in a hazardous area, ensure that all components
are approved for use in such areas. Check the product labels. Change
components only in an area known to be non-hazardous. Performing these
procedures in a hazardous area could result in personal injury or property
damage. To avoid circuit damage when working inside the unit, use
appropriate electrostatic discharge precautions, such as wearing a grounded
wrist strap.
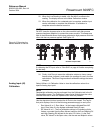
To replace the battery pack.
1. Unscrew the front end cap cover.
2. Remove the LCD display (if applicable).
3. Place the power jumper (located at J1 on the Battery Charger Board)
in the OFF position.
4. Remove the four screws from the Battery Charger Board.
5. Remove the ribbon cable from the Battery Charger Board to the
Backplane Board.
6. Remove the Battery Charger Board.
7. Replace the Battery Charger Board.
8. Replace the ribbon cable from the Backplane Board to the Battery
Charger Board.
9. Replace the four screws from the Battery Charger Board.
10. Reinstall the LCD display (if applicable).
11. Place the power jumper in the ON position.
12. Replace the front end cap cover.
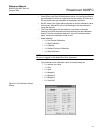
CHANGING THE PLATE The Plate Change option allows the user to change the size of an orifice plate.
1. Select Plate Change from the Meter menu to record an orifice plate
change.
2. Select Yes if the plate change occurs during flowing conditions. Click
No for non-flowing conditions.
3. After selecting the appropriate Meter ID, click Freeze. If performing
the Plate Change under flowing conditions, the dialog box shows the
Freeze Value of each meter input (for purposes of data logging) while
the change is being made. All I/O values are held in Manual mode at
the current value. The values are returned to an active state after
clicking OK in the Plate Change dialog box.
4. Enter the new exact size for the Orifice Diameter (Inches or
Millimeters) in the new plate.
5. Click Apply to record the change creating a record in the Event Log
and restarts the flow calculation using the new orifice size data.
6. Click OK.