


Reference Manual
00809-0100-4832, Rev AA
October 2004
Rosemount 3095FC
3-54
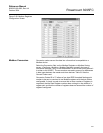
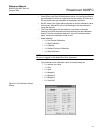
CUSTOM DISPLAYS This section describes the Custom Display option. The Custom Display option
allows the creation of customized “live” displays, loading a display from a disk
file, and monitoring flow and I/O points. Display options are located under the
View menu. The 3095FC stores displays to disk.
New Display A new display must be created while connected to the 3095FC and then
saved either to a disk file or to display memory in the 3095FC. The display
can incorporate “live” data, as well as other information to be conveyed. One
example is a graphical representation of the application that a 3095FC is
monitoring and controlling.
Use the following instructions to create a new display.
1. Select View > Display > New.
2. If the Properties box does not appear, select the Properties button
from the toolbar.
3. Enter the name of the display in the Properties: Form Display Name
field.
4. Select to Enable or Disable the Logical Point Number Selection List.
• When Enabled, enter a Point Type. When selecting a TLP, the
Logical Number (L) comes from the logical listing selection box for
those parameters that have the Point Type (T) match the Point
Type entered in this screen.
• When Disabled, the display is in What You See Is What You Get
(WYSIWYG) mode and the user selects the TLP to view.
5. Place the cursor where the display element is to appear. Right-click
on the mouse and select an element.
• Add Frame - Place like elements in a Frame to group user
selections. Once Frame is in place, drag and drop elements onto
the Frame.
• Add Label - Use labels to mark other elements.
• Add Text Box - Data entry fields.
• Add Check Box - Multiple selection box.
• Add Option Button - Radio button to limit input to a single selection.
NOTE
Create elements in the main Form before dragging and dropping them into a
Frame.
6. Enter or select the desired data in the Properties Form. The items in
the Properties box depend on the added object.
7. Many elements can be created and placed anywhere on the edit
screen. Option buttons should be placed within a frame. Element
properties can be edited at any time.
8. After creating elements to display, click Save to save the display to a
disk file located on the PC or floppy drive. Enter the desired File name
of the disk file, or use the default. The .DSP extension will
automatically be added.