


Reference Manual
00809-0100-4832, Rev AA
October 2004
Rosemount 3095FC
3-55
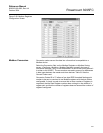
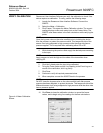
9. Press the Test button to display the screen as it will appear in use.
Use the Update, Autoscan, Stop Scan, Edit, Save, and Close buttons
at the bottom of the screen to perform the following functions:
• Update - Use this button to update all TLP (live data) information
with the current reading from the 3095FC. The message “Reading
Data” appears in the Status Line.
• Apply - Applies changes made to fields in display which display is
not in Autoscan.
• Autoscan - Provides an automatic update on intervals lasting one
to three seconds.
• Stop Scan - Stops Autoscan.
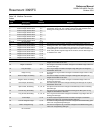
• Edit Display - Change currently selected display.
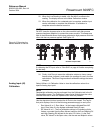
• Character Set - Show the Character Set currently selected for
building the display. This button toggles between viewing and not
viewing Character Sets. Eight different character sets are
supported: two for upper and lower case alphabetical characters,
and six for various types of graphical characters.
• TLP Box - Enter live data from the Rosemount User Interface
Software or 3095FC. To use the TLP Box, first determine the Point
Type to use as a flow input by highlighting it. Next, select the exact
Logical Number. For example, an Analog Input Point Type that the
user might select is AIN A 2. Finally, select the specific Parameter
to use. For example, an Analog Input is typically Filtered EUs.
Save - If the display is new, this push button saves the current
display to a disk file located on the PC. If the display already
exists, this saves the display back to where it had been saved
before. The extension .DSP (display) is added to the specified file
name. Refer to “Save Displays” on page 3-55.
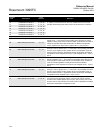
• Save As - Saves the current display to a disk file under a different
name to a file or to internal Display1 or Display2. The
extension.DSP (display) is applied to the name of the file.
• Close - Close the selected display screen with option to save.
NOTE
Use the mouse or >Alt+F6> keys to move between the buttons. Cut, Copy,
and Paste can also be used when creating custom Displays.
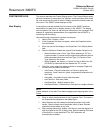
Save Displays After creating a display, store the current display to:
• Disk file located on the PC or floppy drive.
• Display1.
• Display2 (if available in the device).
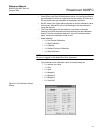
To save a Display:
1. Click Save and proceed to Step 4. Click Save As to save either to a
file or to display memory.
2. Click To Rosemount User Interface Software or To File.
3. If To Rosemount User Interface Software is selected, select Display1
or Display2.
4. If To File is selected, enter the desired File name of the disk file, or
use the default. The .DSP extension will automatically be added.