


MAINTENANCE
2.21
CAMBER AND CASTER
The camber and caster are non-adjustable.
TOE ALIGNMENT
ADJUSTMENT
If toe alignment is incorrect, measure the distance
between vehicle center and each wheel. This will tell
you which tie rod needs adjusting. NOTE: Be sure
handlebars are straight ahead before determining
which tie rod(s) need adjustment.
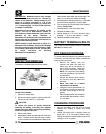
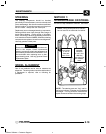
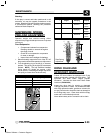
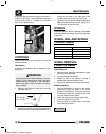
CAUTION: During tie rod adjustment, it is very
important that the following precautions be taken when
tightening tie rod end jam nuts. If the rod end is
positioned incorrectly it will not pivot, and may break.
Incorrectly
Tightened
Jam Nut
Correctly
Tightened
Jam Nut
Hold
Rod End
Ill.2
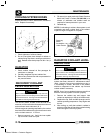
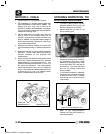
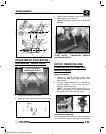
To adjust toe
alignment:
G Hold tie rod end to keep it from
rotating.
G Loosen jam nuts at both end of the tie
rod.
G Shorten or lengthen the tie rod until
alignment is as required to achieve
the proper toe setting as specified
in Method 1 or Method 2.
G IMPORTANT: When tightening the
tie rod end jam nuts, the rod ends
must be held parallel to prevent rod
end damage and premature wear.
Damage may not be immediately
apparent if done incorrectly. See
illustration 2.
G After alignment is complete, torque
jam nuts to 12-14 ft. lbs. (16-19 Nm).
EXHAUST PIPE
WARNING
G Do not perform clean out immediately
after the engine has been run, as the ex-
haust system becomes very hot. Serious
burns could result from contact with ex-
haust components.
G To reduce fire hazard, make sure that
there are no combustible materials in the
area when purging the spark arrestor.
G Wear eye protection.
G Do not stand behind or in front of the ve-
hicle while purging the carbon from the
spark arrestor.
G Never run the engine in an enclosed
area. Exhaust contains poisonous car-
bon monoxide gas.
G Do not go under the machine while it is
inclined. Set the hand brake and block
the wheels to prevent roll back.
Failure to heed these warnings could result in
serious personal injury or death.
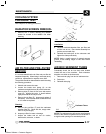
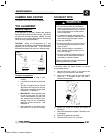
Periodically clean the spark arrestor to remove
accumulated carbon.
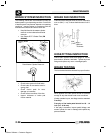
1. Remove the three screws (1) and remove the
arrestor (2) from the end of the muffler.
2. Use a non-synthetic brush to clean the arrestor
screen (3). A synthetic brush may melt if
components are warm.
1
2
3
3. Inspect the screen for erosion and replace if
necessary.
4. Remove and inspect the gasket. Replace if worn
or damaged.
5. Reinstall the gasket and arrestor.
6. Torque screws to 50 in. lbs. (5.6 Nm).
Enfocus Software - Customer Support