


7.23
FINAL DRIVE
7
ADC Coil Testing
Refer to the following tests in Chapter 10:
See “ALL WHEEL DRIVE (AWD) COIL” on page 10.24.
See “ACTIVE DESCENT CONTROL (ADC) COIL” on
page 10.24.
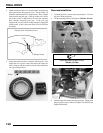
ADC Differential Hydraulic Circuit Bleeding
1. Make sure vehicle is parked on flat ground and allowed to
sit at least 30 minutes prior to bleeding hydraulic circuit.
2. Thoroughly clean area around and on remote reservoir and
hydraulic bleeders.
3. Remove reservoir cap and diaphragm assembly.
4. Make sure hydraulic oil inside reservoir is free of debris.
If any debris is found, use clean rag or suction device to
remove from the reservoir.
NOTE: Debris in reservoir may block porting and
produce inadequate bleeding of the system.
Decreased performance may be encountered with
inadequate bleed of the hydraulic circuit.
5. Begin the bleeding process by filling reservoir to ‘MAX’
line with clean Polaris ADC oil . (AW ISO 10 hydraulic
fluid equivalent).
6. Locate bleeder valves found on either side of differential
and remove the protective caps.
7. Turn bleeder valves counter-clockwise to loosen. Loosen
bleeder screw slowly, allowing oil and any trapped air to
flow out of fitting.
IMPORTANT: Do not allow hydraulic fluid in reservoir
to drain below minimum fill line. Close bleeder valve
before oil level falls below minimum fill line. Refilling
empty reservoir will result in air pockets becoming
trapped.
NOTE: If empty reservoir is encountered, filling of
fluid is still possible. Verify air is not trapped before
proceeding with step 7.
8. Continue steps 6-8 on both sides in sequence until no air
bubbles are seen when bleeding occurs.
9. Re-torque both bleeder valves to specification and reinstall
cover caps.
10. Fill reservoir with to a level midway between ‘MAX’ and
‘MIN’ fill lines. Verify no debris is found in reservoir oil.
11. Replace reservoir cap securely and wipe clean any residue.
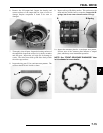
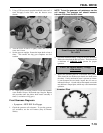
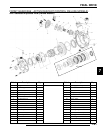
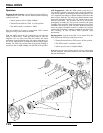
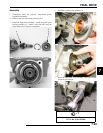
Disassembly / Inspection
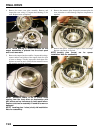
1. Drain and properly dispose of used oil. Remove any metal
particles from the drain plug magnet.
2. Remove the piston pump assembly from the gearcase.
NOTE: Piston pump assembly is a non-serviceable
item and should not be disassembled. Replace as an
assembly if found to be damaged or non-working.
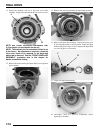
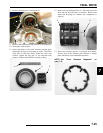
3. Remove bolts (arrows) retaining the outer cover plate
assembly.
= T
Bleeder Valve Torque:
80 in. lbs. (9 Nm)