


9 - AUX PAGES
155
190-00356-00 Rev E
Flight Planning
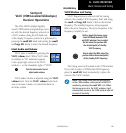
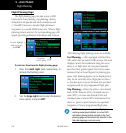
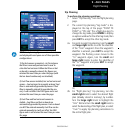
Density Alt / TAS / Winds— indicates the theo-
retical altitude at which your aircraft will perform
depending upon several environmental conditions,
includingindicatedaltitude(INDALT),barometric
setting (BARO) and total air temperature (TAT; the
temperature, including the heating effect of speed,
read on a standard outside temperature gauge).
This computes true airspeed (TAS), based upon the
factors above and the calibrated airspeed (CAS).
Also, this determines winds aloft—the wind direc-
tion and speed—and a head wind/tail wind com-
ponent, based upon the calculated density altitude
(DENALT),trueairspeed,aircraftheading(HDG)
and ground speed.
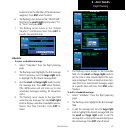
Crossfill— allows the pilot to transfer the active
flight plan,includingVNAVparametersanystored
flight plan, a user waypoint or all user waypoints
between two 400W-Series Garmin units in a dual-
unit installation.
Scheduler— displays reminder messages (such
as “Change oil”, “Switch fuel tanks”, “Overhaul”,
etc.). One-time, periodic, and event-based messages
are allowed. One-time messages will appear once
the timer expires and will reappear each time the
400W-series unit is powered on, until the message
is deleted. Periodic messages will automatically
reset to the original timer value, once the message
is displayed. Event-based messages do not use a
timer, but rather a specific date and time.
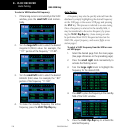
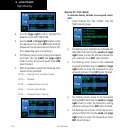
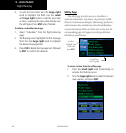
Fuel Planning
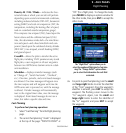
To perform fuel planning operations:
1. Select “Fuel Planning” from the flight planning
page.
2. The current fuel planning “mode” is displayed
at the top of the page: “POINT TO POINT” or
“FPL” (for a flight plan). To change the mode,
press MENU to display an options window for
the other mode, then press ENT to accept the
other mode.
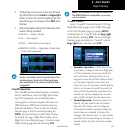
The “Flight Plan?” option allows you to
select the numbered flight plan for fuel plan-
ning. The “Change Fields?” option allows
you to select fuel information for each field
as desired.
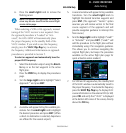
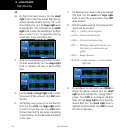
3a. For point-to-point fuel planning, turn the small
and large right knobs to enter the identifier
of the “from” waypoint. Once the waypoint’s
identifier is entered, press ENT to accept the
waypoint. The flashing cursor moves to the
“to” waypoint. Again, turn the small and
large right knobs to enter the identifier of
the “to” waypoint and press ENT to accept
the waypoint.