


3. Check for any shifting of the barpin.
4. Check for cracks in the metal components and
welds.
NOTE: The AirLiner suspension is manufactured
at numerous weight ratings up to 46,000
pounds. The control rod on the 46,000-pound-
rated suspension is larger, and is fastened dif-
ferently than on other applications; see Group
32 of the
Acterra
®
Workshop Manual
for re-
moval and installation information.
Freightliner TufTrac
1. Inspect the suspension spring assemblies for
pitted, cracked, broken, or abnormally bent
leaves and extreme rust. If any of these condi-
tions exist, replace the spring assembly.
WARNING
Do not replace individual leaves of a damaged leaf
spring assembly; replace the complete spring as-
sembly. Visible damage (cracks or breaks) to one
leaf causes hidden damage to other leaves. Re-
placement of only the visibly damaged part(s) is
no assurance that the spring is safe. On front
spring assemblies, if cracks or breaks exist in the
two top leaves, a loss of vehicle control could
occur. Failure to replace a damaged spring assem-
bly could cause an accident resulting in property
damage, serious personal injury, or death.
IMPORTANT: On multi-leaf suspensions, closely
inspect each component of the leaf spring as-
semblies, including the brackets, U-bolts, and
related parts.
2. Inspect the brackets for cracks in the castings.
Inspect the V-rod tower welds for cracking or
other signs of damage. Also check for contact
between the frame rail and the upper axle clamp
brackets. If contact exists, check the V-rod bush-
ing for wear. Check the V-rod fastener torques.
3. Inspect the rubber center bearing and spring tip
pads for excessive wear, including de-lamination
of the rubber-to-metal shim interface, and distor-
tion and degradation of rubber.
4. Inspect the V-rods and lower control rods for
wear and looseness.
4.1 Without disconnecting the control rods,
use your hand to attempt to move each of
the control rod ends up, down, in, and
out. If there is any movement, examine
the control rods for wear or damage. Re-
place if necessary.
4.2 Inspect the rubber bushings for cracks or
cuts.
4.3 Check for any shifting of the barpin.
4.4 Check for cracks in the metal compo-
nents and welds.
5. Check all fasteners for looseness.
6. Inspect the shock absorbers for oil leaks and
worn rubber bushings. Replace the shock ab-
sorbers and/or rubber bushings if wear or dam-
age is noted.
Hendrickson Suspension
Inspecting
Inspect the suspension assembly for wear, cracks,
and damage to its components. Replace the compo-
nent(s) if any wear, cracks, or damage exists. For
instructions, see Group 32 of the
Acterra
®
Workshop
Manual
. Check all fasteners for tightness.
Check for distorted or frayed rubber at the beam end
bushings. If the bushings are damaged, replace
them.
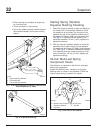
Check that the ends of the equalizer beam are not
lower in the beam hanger.
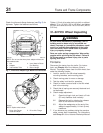
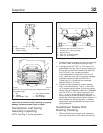
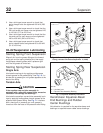
If the equalizer beam ends appear lower, use a jack
to raise each beam end, and check for movement of
the inner metal of the rubber end bushing (see Fig.
5). Movement cannot be corrected by tightening the
fastener, because parts could be damaged. If there is
movement, replace the rubber end bushings and all
connecting parts.
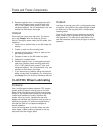
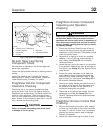
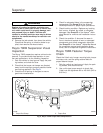
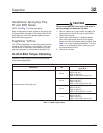
After repairs to the suspension, check the fastener
torque after the vehicle has been in service for 2500
miles (4000 km). Tighten the adapter-type beam end
connection nut (see Fig. 6), 210 to 240 lbf·ft (285 to
325 N·m). Do not over-torque.
WARNING
Insufficient beam end fastener torque could cause
the beam to separate from the axle. This will
Suspension32
Acterra Maintenance Manual, September 200232/4