• Diesel Particulate Filter (DPF)—a filter that col-
lects and holds particulate matter (soot and
ash).
• Diesel Oxidation Catalyst (DOC)—oxidizes hy-
drocarbons and reduces NOx.
• Sensors—detect temperatures and pressures in
the ATS.
Inspection
1. Check for leakage at the clamp that attaches the
exhaust pipe to the turbocharger exhaust outlet.
If leakage exists, tighten the nut on the clamp to
the required torque. If leakage persists, install a
new clamp.
2. Check the exhaust pipe, bellows, and each ex-
haust seal clamp for leakage, wear, cracks, or
damage. Replace damaged components as
needed. If leakage exists at a clamp, tighten the
nuts to the required torque. If leakage persists,
install a new exhaust seal clamp. Do not reuse
seal clamps. Once a seal clamp is loosened or
removed, it must be replaced.
3. If present, check the condition of the insulation
material around the exhaust pipe between the
turbocharger and the ATD.
4. Check the ATD mounting bands for tightness.
Tighten to 30 lbf·ft (41 N·m) if needed. Do not
overtighten.
5. Check for leaks around the clamps that attach
the ATD in the ATS, and around the clamps that
retain the DPF in the ATD. No leaks are allowed
anywhere in the system.
6. Check all sensors attached to the ATD for leaks
or damaged wires. No leaks are allowed.
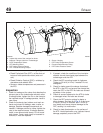
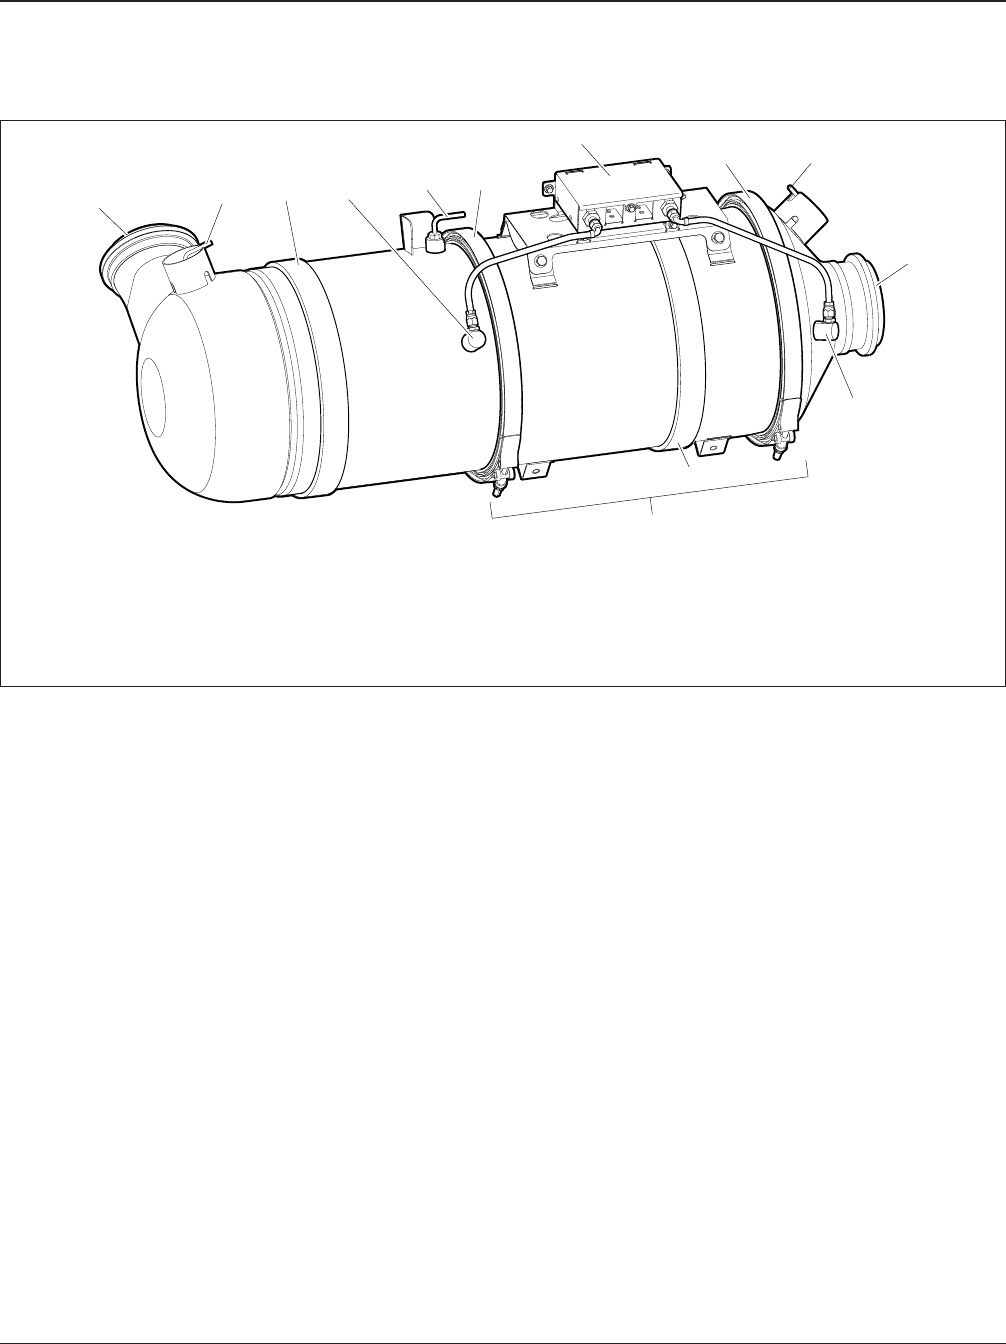
7. Check the DPF exterior surface for dents or
other damage. See Item A of Fig. 3. A dent over
3 inches (76 mm) in diameter and 1/4-inch (6-
mm) deep could cause internal damage to the
DPF, causing it to malfunction.
8. Check for heat discoloration on the surface of
the ATD. Heat discoloration may indicate internal
damage; especially around the DPF.
f490283
1
2
2
5
6
5
7
8
9
3
3
4
10/20/2006
A
A. Inspect this area of the canister for dents.
1. Marmon Fitting at Inlet from Turbocharger
2. DOC Temperature Sensor
3. ATD Mounting Band
4. DPF Intake Pressure Sensor
5. DPF V-Band Mounting Clamps
6. Sensor Housing
7. DPF Outlet Temperature Sensor
8. Exhaust Outlet Marmon Fitting
9. DPF Outlet Pressure Sensor
Fig. 3, Typical After-Treatment Device
Exhaust49
Acterra Maintenance Manual, January 200749/2


