


11. Check and adjust the fluid level using the proce-
dure under "Checking the Fluid Level."
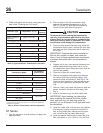
Approved Allison Transmission Lubricants
Lubricant Type
*
Temperature: °F (°C)
SAE
Viscosity
All Allison Transmissions
Castrol TranSynd
™
(synthetic)
Above –22 (–30) —
On-Highway Transmissions (1000/2000/2400 Series)
Dexron
®
III Above –13 (–25) —
AT and MD Series
Dexron III Above –13 (–25) —
MT Series
Dexron III Above –13 (–25) —
Type C4 10 to 120 (–12 to 48) SAE 10W
Type C4 32 to 120 (0 to 48) SAE 30W
*
Lubricants listed in order of preference. Do not mix types of oil.
Table 3, Approved Allison Transmission Lubricants
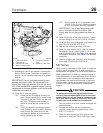
Allison Transmission Lubricant Capacities
Transmission Model
Fill Capacity
*
:
quarts (liters)
On-Highway Series
1000/2000/2400 15.0 (14.2)
AT Series
AT–545 16.0 (15.1)
MT Series
MT–643
15.0 (14.2)
MT–653
MD Series
MD–3060
19.0 (18.0)
MD–3560
*
Quantities listed are approximate. Add the recommended amount of fluid
as listed under fill capacity, then perform a "hot check" and add fluid as
needed. Do not overfill.
Table 4, Allison Transmission Lubricant Capacities
AT Series
1. Park the vehicle on a level surface and apply the
parking brakes.
2. Run the engine until the transmission fluid
reaches the operating temperature of 160 to
200°F (71 to 93° C). Shift the transmission to
neutral (N) and shut down the engine.
CAUTION
To prevent dirt from entering the transmission,
use only clean containers and fillers for the trans-
mission fluid. Do not use fillers or containers that
have been used for water or antifreeze. Dirt, water,
or antifreeze could damage the transmission.
3. Clean the area around the drain plug. While the
transmission fluid is warm, remove the drain plug
and drain the fluid. Disconnect the fill tube from
the oil pan.
IMPORTANT: Examine the used transmission
fluid for dirt, coolant or water, and metal par-
ticles. If any of these contaminants are present,
a problem may exist within the transmission
system.
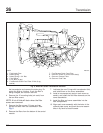
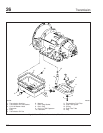
4. Support the oil pan, then remove the twenty-one
washer-head screws that attach the oil pan to
the transmission case. Remove the pan, and dis-
card the pan gasket.
5. Clean the oil pan with mineral spirits.
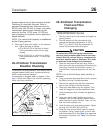
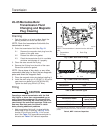
6. Remove the washer-head screw that attaches
the internal fluid filter to the filter spacer, then
remove the filter and discard it. See Fig. 3. Re-
move the fluid intake tube, then remove the seal
ring from the intake tube, and discard the seal
ring.
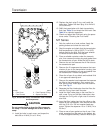
7. Remove, clean, and install the governor feed line
screen, located in the control valve body. See
Fig. 4.
8. Install a new seal ring in the fluid intake tube.
IMPORTANT: Avoid twisting the intake tube
when installing the internal fluid filter, intake
tube, and seal ring; the seal ring could be
pinched, cut, or deformed. An air-tight seal must
be maintained.
9. Install the intake tube, with the seal ring installed,
into the main housing. Install the internal fluid
filter on the intake tube, making sure the grom-
met in the filter fits the intake tube snugly.
10. Install the washer-head screw to retain the fluid
filter, and tighten it 10 to 15 lbf·ft (14 to 20 N·m).
Transmission26
Acterra Maintenance Manual, March 200526/4