


12. Apply two level teaspoons of Aeroshell Grade 5
(ES1246) grease on each side of the assembly.
Apply it evenly along the full length of the V-way
groove and anchor plate rail, and apply one level
teaspoon evenly on both sides of the key and
spring. After the caliper is installed, pack any ac-
cumulation of grease at each end of the rail and
along the top of the rail or key at the V-way.
13. Being careful not to get grease or dirt on the pad
face, install each brake pad.
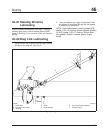
14. Grasp the caliper firmly, rest the V-ways on the
forward anchor plate torque rail (the large rail)
and swing the caliper into place. Make sure that
the brake hose is not twisted. Do not get grease
on the pad faces or rotor surfaces.
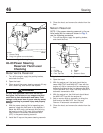
15. With the caliper installed and firmly seated on
the forward rail (large rail), position the key and
spring between the caliper V-way and the anchor
rail from the inboard end of the anchor rail.
16. Carefully drive the key and spring into place. In-
stall the key-retaining fastener and torque 12 to
18 lbf·ft (16 to 24 N·m).
17. Install the wheels. For instructions, see Group
40 of the
Acterra
®
Workshop Manual
.
18. Before moving the vehicle, press the brake pedal
several times to bring the pistons back to the
normal position.
19. Raise the vehicle, remove the jack stands, and
lower the vehicle to the ground.
20. Remove the chocks from the tires.
21. Test drive the vehicle and ensure that the brakes
operate properly.
42–24 Brake Inspection
IMPORTANT: This procedure should be per-
formed prior to lubrication of the brake compo-
nents.
Parking Brake Operational Check
CAUTION
Perform the following check in a clear safe area. If
the parking brakes fail to hold the vehicle, per-
sonal injury or property damage may result.
1. With the engine running, and air pressure at cut-
out pressure, set the parking brake.
2. Put the vehicle in the lowest gear and gently at-
tempt to move it forward. The vehicle should not
move. If the vehicle moves, the parking brakes
are not operating correctly and must be repaired
before the vehicle is returned to service. See
Group 42 of the
Acterra
®
Workshop Manual
for
repair procedures.
Brake Component Inspection
1. Park the vehicle on a level surface, set the park-
ing brake, and chock the tires. Once the tires are
chocked, release the parking brake.
WARNING
Manually adjusting an automatic slack adjuster to
bring the pushrod stroke within legal limits is
likely masking a mechanical problem. Adjustment
is not repairing. Before adjusting an automatic
slack adjuster, troubleshoot the foundation brake
system and inspect it for worn or damaged com-
ponents. Improperly maintaining the vehicle brak-
ing system may lead to brake failure, resulting in
property damage, personal injury, or death.
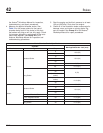
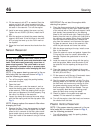
2. With the engine off, and 100 psi (689 kPa) of air
tank pressure, have an assistant apply and hold
an 80 to 90 psi (550 to 620 kPa) brake applica-
tion.
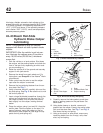
3. Check to see if the colored over-stroke band on
each brake chamber pushrod is exposed.
If a band shows, the stroke is too long. Check
the foundation brake components for wear or
damage, and repair as needed. See Group 42 of
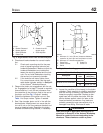
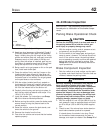
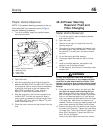
f420595a
10/28/94
1
2
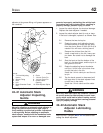
1. V-Ways
2. Bleeder Fitting
Fig. 9, Caliper V-Ways
Brakes 42
Acterra Maintenance Manual, October 2007 42/11