


3.3 If leakage persists, use the instructions in
Group 42 of the
Acterra
®
Workshop
Manual
to replace the service brake dia-
phragm.
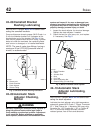
3.4 Using soapy water, coat the area around
the piston-rod bore. On some Bendix ser-
vice chambers loosen the boot, if neces-
sary. No leakage is permitted. If there is
leakage, use the instructions in the appli-
cable brake chamber section in Group 42
of the
Acterra
®
Workshop Manual
and
replace the service brake diaphragm.
NOTE: On weatherproof Bendix chambers, the
leakage check can be performed at the cross-
drilled mounting stud.
Parking Brake Operation and
Leakage Checking
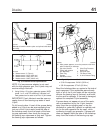
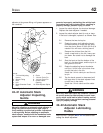
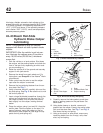
WARNING
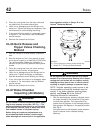
Do not loosen or remove the parking brake clamp
ring for any purpose at any time. See Fig. 1. The
parking/emergency brake section is not intended
to be serviced. Serious injury or death may result
from sudden release of the power spring.
Before doing any repairs or adjustments on a
service/parking brake chamber, read the appli-
cable warnings and instructions in the applicable
brake chamber section in Group 42 of the
Acterra
®
Workshop Manual
.
1. Park the vehicle on a level surface. Chock the
tires.
2. Build the air pressure in the system to at least
100 psi (690 kPa), and shut off the engine.
3. Place the park control valve in the park position.
The brake should apply immediately. Place the
park control valve in the released position. The
brake should release immediately.
If the brakes do not apply or release as required,
see the air brake system troubleshooting guide in
the applicable brake chamber section in Group
42 of the
Acterra
®
Workshop Manual
for possible
causes and corrections.
WARNING
Do not disconnect the pressurized parking brake
hose. If disconnected under pressure, the parking
brake hose will whip as air escapes from the line,
and the air stream can direct dirt or sludge toward
persons in the area, which could result in injury.
4. Check the parking brake chambers for leakage.
4.1 With the park control valve released,
apply soapy water around the parking
brake diaphragm clamp ring and at the
drain slots and exhaust breather on the
body. Disconnect the service brake hose
at the service port, and apply soapy water
to check for piston O-ring leakage.
WARNING
Read and follow all applicable warnings and in-
structions in the applicable brake chamber section
in Group 42 of the
Acterra
®
Workshop Manual
for
repairs to the service/parking brake chambers.
These chambers contain a power spring, which if
released, could cause serious injury or death.
4.2 If leakage is detected at either the clamp
ring or the drain slots, replace the parking
brake section. Slight leakage is permitted
at the service port. Any other leakage is
not acceptable. Using the instructions in
the applicable brake chamber section in
Group 42 of the
Acterra
®
Workshop
Manual
, replace the parking brake section
(
do not attempt to service the parking
brake section
).
5. Connect the air hose to the brake chamber, mak-
ing sure that the fittings are clean and free of
debris. Tighten the nut finger-tight. Using a
wrench, further tighten the nut until you feel re-
sistance. Then, tighten the nut one-sixth turn
more.
6. Repeat the above steps for each parking brake
chamber.
7. Apply the parking brakes. Remove the chocks
from the tires.
Brakes 42
Acterra Maintenance Manual, October 2007 42/5