


CAUTION
Do not use the bolts to draw the filter covers to
the sump. This can damage the covers, seals, or
sump.
11. Install six bolts in each cover, and torque the
bolts 38 to 44 lbf·ft (51 to 61 N·m).
12. Replace the drain plug O-ring, and install the
drain plug. Tighten the drain plug 18 to 24 lbf·ft
(25 to 32 N·m).
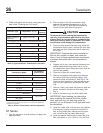
13. Refill the transmission with fresh transmission
fluid (see Table 3) and check the fluid level. See
Table 4 for lubricant capacities.
14. Check and adjust the fluid level using the proce-
dures under "Checking the Fluid Level."
MT Series
1. Park the vehicle on a level surface. Apply the
parking brakes and chock the rear tires.
2. Start the engine and check that the transmission
fluid temperature is 160 to 200°F (71 to 93°C)
before draining the fluid. Shift the gear selector
to neutral and shut down the engine.
3. Place a suitable container under the transmis-
sion, then remove the drain plug and gasket from
the transmission oil pan. Allow the fluid to drain.
4. Remove the nut that secures the oil filler tube to
the transmission pan.
5. Remove the 21 capscrews that secure the trans-
mission oil pan to the transmission housing, then
remove the transmission oil pan and gasket from
the transmission. Discard the gasket.
6. Clean the oil pan of any debris and residual fluid
in an approved cleaning tank.
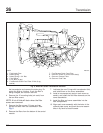
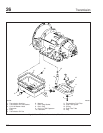
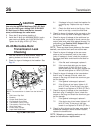
7. Remove the washer-head capscrew that secures
the filter to the transmission, then remove the
filter and the filter intake pipe from the transmis-
sion. See Fig. 6.
8. Separate the filter intake pipe from the filter, dis-
card the O-ring, then clean the tube.
9. Install the filter intake pipe on the new filter. In-
stall a new O-ring on the filter intake tube, then
lubricate the O-ring with a light coat of transmis-
sion fluid.
10. Insert the filter intake pipe into the orifice on the
bottom of the transmission, then secure the filter
with the 5/16–18 x 5/8 inch washer-head cap-
screw. Tighten the capscrew 10 to 15 lbf·ft (14 to
20 N·m).
11. Place a new oil pan gasket on the oil pan. If de-
sired, a sealant may be used on the gasket, but
it must be applied carefully; sealant must be pre-
1
1
1
1
2
2
3
3
4
4
f260317
08/25/95
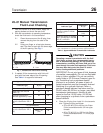
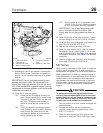
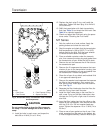
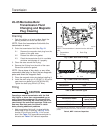
1. Filter Cover
2. Filter Element
3. Filter Element O-Ring
4. Square-Cut Seal
Fig. 5, Allison MD Series Transmission Filter Locations
and Components
Transmission 26
Acterra Maintenance Manual, March 2005 26/7