


83–01 Air Conditioner
Inspecting
WARNING
Wear eye protection, gloves, and protective cloth-
ing when working on the air conditioning system.
Leaking refrigerant from a damaged hose or line
could cause blindness or serious skin burns.
Preliminary Checks
1. Park the vehicle on a level surface, apply the
parking brakes, and chock the tires.
2. Check the appearance of the air conditioner
compressor pulley assembly. If the friction sur-
face of the pulley shows signs of excessive
grooving due to belt slippage, replace both the
pulley and the drive plate. Visually inspect the
refrigerant compressor drive belt for damage,
and check that the belt is set at the proper ten-
sion. Also check the tightness of the compressor
mounting fasteners. For instructions and torque
values, see Group 01 of the
Acterra
®
Workshop
Manual
.
3. Inspect the drive plate. If the friction surface of
the drive plate shows visible signs of damage
due to excessive heat, replace the drive plate
and pulley assembly. in Group 83 of the
Acterra
®
Workshop Manual
for removal and in-
stallation procedures.
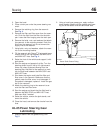
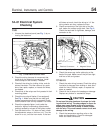
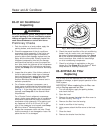
4. On a Sanden refrigerant compressor, use a
feeler gauge to check that the drive plate clutch
clearance is 0.016 to 0.03 inch (0.4 to 0.8 mm).
See Fig. 1. If the drive plate clutch requires ad-
justment, see Group 83 of the
Acterra
®
Work-
shop Manual
.
On a Climate Control refrigerant compressor,
place a feeler gauge between the air conditioner
compressor clutch and the pulley to check the
compressor clutch clearance. Drive plate to pul-
ley clearance is 0.02 to 0.03 inch (0.6 to 0.8
mm). If the clearance is not correct, see Group
83 of the
Acterra
®
Workshop Manual
5. Inspect the compressor clutch coil wire. Check
that the connector is not damaged or loose. Re-
place the wire if it is damaged.
6. Check the overall condition of the air conditioning
hoses. Look for cracks, cuts, and abrasions on
the hoses. Replace damaged hoses. See Group
83 of the
Acterra
®
Workshop Manual
for replace-
ment instructions. Also, check for loose fittings
on all air conditioning components.
7. Check for a buildup of road debris on the con-
denser fins. See Group 83 of the
Acterra
®
Work-
shop Manual
for cleaning instructions.
83–02 HVAC Air Filter
Replacing
The air filter must be replaced every six months, re-
gardless of mileage, to permit proper operation of the
HVAC system.
IMPORTANT: When replacing the air filter, use
only a Sterling-approved air filter.
1. Turn off the engine, apply the parking brakes,
and chock the tires.
2. Open the hood.
3. Remove the screws that attach the filter cover to
the filter housing. See Fig. 2.
4. Remove the filter from the housing.
5. Install a new filter in the housing.
6. Using screws, attach the filter cover to the hous-
ing.
7. Close the hood.
8. Remove the chocks from the tires.
08/25/94
f830641
Fig. 1, Drive Plate Clearance Inspection
Heater and Air Conditioner 83
Acterra Maintenance Manual, March 2003 83/1