


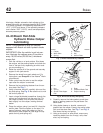

adjuster at the grease fitting until grease appears on
the camshaft.
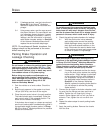
42–21 Automatic Slack
Adjuster Inspecting,
Gunite
WARNING
Manually adjusting an automatic slack adjuster to
bring the pushrod stroke within legal limits is
likely masking a mechanical problem. Adjustment
is not repairing. Before adjusting an automatic
slack adjuster, troubleshoot the foundation brake
system and inspect it for worn or damaged com-
ponents. Improperly maintaining the vehicle brak-
ing system may lead to brake failure, resulting in
property damage, personal injury, or death.
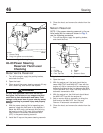
1. Inspect the slack adjuster for structural damage.
Replace the slack adjuster if needed.
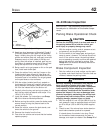
2. Inspect the slack adjuster boot for cuts or tears.
If the boot is damaged, replace it as follows. See
.
2.1 Remove the two clevis pins.
2.2 Rotate the worm shaft adjusting hexnut
counterclockwise to move the link away
from the clevis. About 45 lbf·ft (60 N·m) is
needed. You will hear a clicking sound.
Remove the old boot from the link.
2.3 Install a new boot on the link, heavy sec-
tion down. Be careful not to damage the
boot.
2.4 Seat the boot so that the bottom of the
boot is in the boot insert, and the top is in
the groove of the link.
2.5 Rotate the adjusting hexnut clockwise
until the 1/4-inch hole in the clevis lines
up with the hole in the link.
Install the 1/4-inch clevis pin and the cot-
ter pin.
2.6 Tap the clevis upward or downward until
the large hole in the slack adjuster lines
up with one in the clevis.
Install the 1/2-inch clevis and the cotter
pin.
WARNING
Make sure both clevis pins are installed. Failure to
do so will cause the slack adjuster to work incor-
rectly, which could lead to loss of braking control.
This could result in an accident causing personal
injury or property damage.
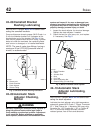
42–22 Automatic Slack
Adjuster Lubricating,
Haldex
IMPORTANT: Perform MOP 42–24 before lubri-
cating the slack adjusters.
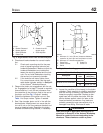
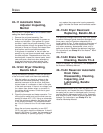
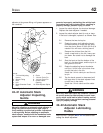
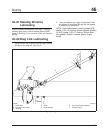
f420653a
1
2
3
4
5
6
7
8
10
9
10/27/93
1. 7/16-Inch Adjusting
Hexnut
2. Grease Fitting
3. Boot
4. Link
5. Brake Chamber Piston
Rod
6. Clevis
7. 1/2-Inch Clevis Pin
8. 1/4-Inch Clevis Pin
9. Grease Relief
Opening
10. Slack Adjuster Spline
Fig. 6, Gunite Automatic Slack Adjuster
Brakes 42
Acterra Maintenance Manual, October 2007 42/9