


42–16 Air Brake Valve
Disassembly, Cleaning,
and Inspecting, Bendix
E–8P, R–12, R–14, SR–1,
ST–3, TC–6, and TP–3DC
Disassemble each brake valve, clean the parts with
mineral spirits, and inspect the parts. Replace all rub-
ber parts and any worn or damaged parts. Use only
genuine Bendix replacement parts or kits. Assemble
and install the valves. Check for proper operation
and leakage. For instructions, see Group 42 of the
Acterra
®
Workshop Manual
.
42–17 Brake Lining Wear
Checking, Hydraulic
Disc Brakes
Before checking lining wear with the wheel removed,
review the following brake lining exposure warnings.
WARNING
Breathing brake lining dust (asbestos or non-
asbestos) could cause lung cancer or lung dis-
ease. Unless exposure can be reduced below legal
limits, wear an air purifying respirator approved
by MSHA or NIOSH at all times when servicing the
brakes, starting with removal of the wheels and
continuing through assembly.
To minimize the possibility of creating airborne brake
lining dust, clean the dust from the brake rotor, brake
caliper, and brake assembly, using an industrial-type
vacuum cleaner equipped with a high-efficiency filter
system. Then, using a rag soaked in water and
wrung until nearly dry, remove any remaining dust.
Do not use compressed air or dry brushing to clean
the brake assembly.
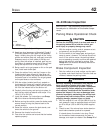
1. Check lining wear.
1.1 Apply the parking brakes. Chock the tires
to prevent vehicle movement.
1.2 Remove one or more of the lining inspec-
tion plugs, and measure brake lining
thickness.
1.3 On front and rear axles, replace linings
worn to less than 1/16 inch (1.6 mm).
1.4 Make sure that the brake rotor and linings
are free of oil and grease.
1.5 Install the inspection plug(s).
2. If the wheel and hub assembly is removed from
the axle, check lining wear. Replace the linings
on all brake assemblies if worn to less than 1/16
inch (1.6 mm) at the thinnest point.
NOTE: To replace the brake linings, see the ap-
plicable foundation brake section in Group 42 of
the
Acterra
®
Workshop Manual
.
42–18 Brake Lines Checking,
Hydraulic Disc Brakes
Check all hydraulic lines and fittings for damage,
leakage, or looseness.
Replace damaged or leaking components, and
tighten loose fittings.
42–19 Power Booster
Checking, Bendix
Hydro-Max
®
Check for proper operation. For instructions, see
Group 42 of the
Acterra
®
Workshop Manual
.
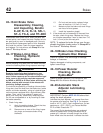
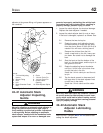
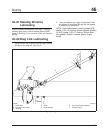
42–20 Automatic Slack
Adjuster Lubricating,
Gunite
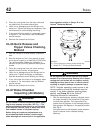
IMPORTANT: Perform MOP 42–24 before lubri-
cating the slack adjusters.
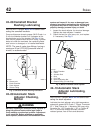
Lubricate the slack adjuster until grease flows from
the grease relief opening. See Fig. 6. For tempera-
tures to –40°F (–40°C), use Lubriplate Aero; for tem-
peratures to –20°F (–29°C), use Texaco Multifak
EP-2 or Mobil Grease No. 77.
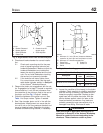
The newest Gunite slack adjusters are produced
without a grease relief. During lubrication with a
grease gun, lubricant is forced through the drilled
worm wheel onto the camshaft. Lubricate the slack
Brakes42
Acterra Maintenance Manual, October 200742/8