


4.3 Press down on the pedal several times,
until no more fluid drains from the reser-
voir.
4.4 Cover the hose to avoid contamination of
the clutch hydraulic fluid.
5. Connect the hydraulic hose to the slave cylinder.
Install the clamp, as removed.
6. Fill the reservoir with approved DOT 3 brake fluid
and bleed the system according to the proce-
dures under the heading "Bleeding the Clutch."
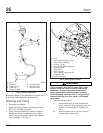
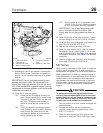
See Fig. 4.
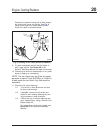
Bleeding the Clutch
1. Apply the parking brake and chock the tires.
2. Prepare the pressure bleeding equipment ac-
cording to the manufacturer’s instructions. Use
DOT 3 brake fluid. Pressurize the bleeder unit to
15 psi (103 kPa).
CAUTION
Do not spill clutch hydraulic fluid (DOT 3 brake
fluid) on the cab paint. Clean it off immediately if
any is spilled. DOT 3 brake fluid can damage
paint.
3. Remove the reservoir lid and install the pressure
bleed adaptor on the reservoir.
4. Remove the cap from the bleed valve. Install a
transparent drain hose on the bleed valve of the
slave cylinder.
IMPORTANT: The slave cylinder may not be
mounted in a horizontal position. If it isn’t, re-
move the slave cylinder and hold it in a horizon-
tal position to completely purge all air from the
cylinder.
5. Pressurize the reservoir, filling the system. Open
the bleed valve on the bleed tank.
NOTE: A pressure bleeder hose (J-29532) and
a bleeder adaptor (J-35798) for the fluid reser-
voir are available through SPX Kent-Moore
Tools and may be used to complete the follow-
ing procedure. To order these parts, call Kent-
Moore at 1-800-328-6657.
6. Press the clutch pedal all the way down and
keep it down.
7. Open the slave cylinder bleed valve. Observe the
flow of clutch hydraulic fluid through the drain
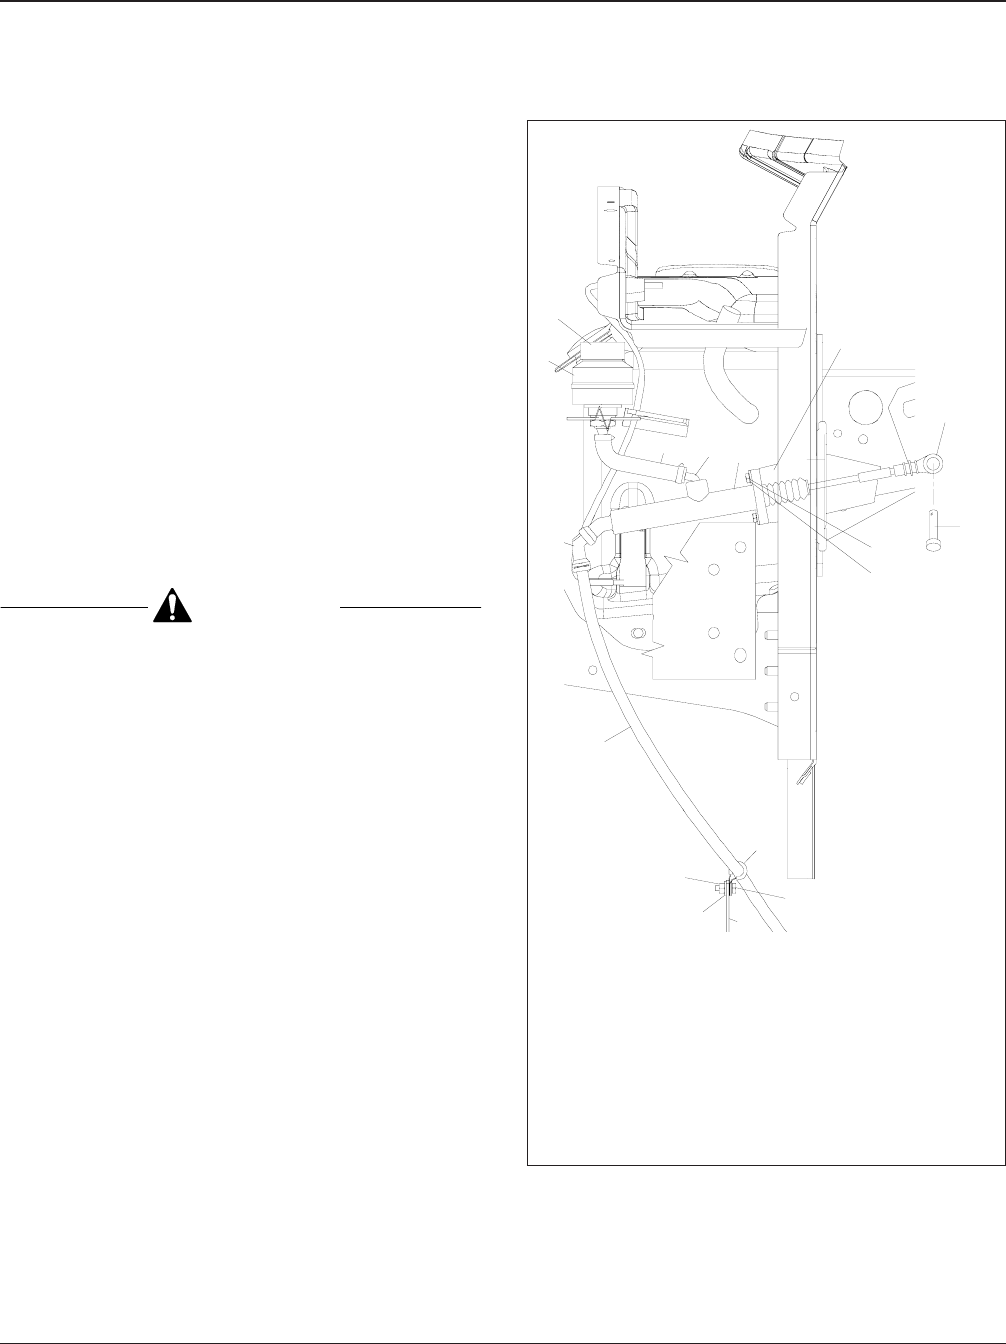
f250594
1
2
3
4
5
8
9
10
12
13
14
15
16
17
08/05/2002
6
7
11
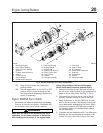
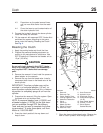
1. Reservoir
2. Reservoir Cap
3. Clutch Support Plate
4. Locking Capscrew, M6
5. Hardened Flatwasher
6. Clevis
7. Clevis Pin
8. Master Cylinder
9. Elbow Connector
10. Reservoir Hose
11. Hose Connector
12. Hydraulic Hose
13. Cushioned Clamp
14. Clamp Mounting Bolt,
1/4–20
15. Steel-Plated Washer
16. Locknut, 1/4–20
17. Shock Bracket
Standoff Bracket
Fig. 4, Clutch Master Cylinder
Clutch 25
Acterra Maintenance Manual, September 2002 25/3