


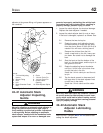

42–11 Automatic Slack
Adjuster Inspecting,
Meritor
IMPORTANT: Perform MOP 42–24 before lubri-
cating the slack adjusters.
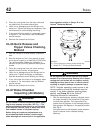
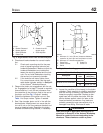
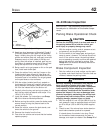
1. Remove the pull-pawl assembly. See .
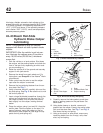
2. Examine the pull-pawl assembly for grease re-
tention and condition. If the grease is in good
condition, install the pull-pawl assembly. Lube
the slack adjuster through the grease fitting until
lubricant is forced out through the inboard cam-
shaft splines and the pull-pawl assembly.
If the grease is hardened, or the pull-pawl as-
sembly is dry and shows extreme wear, remove
the slack adjuster. Disassemble and clean the
slack adjuster. Inspect the internal parts. Install
new seals and a new boot when assembling.
Install and lubricate the slack adjuster. See
Group 42 of the
Acterra
®
Workshop Manual
.
42–12 Air Dryer Checking,
Bendix AD–9
During cold-weather operation, check the operation
of the end cover heater and thermostat assembly.
1. With the ignition on, check for voltage to the
heater and thermostat assembly. Unplug the
electrical connector at the air dryer, and place
the test leads of a voltmeter on each of the pins
of the male connector. If there is no voltage, look
for a blown fuse, broken wires, or corrosion in
the vehicle wiring harness. Check that a good
ground path exists.
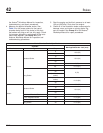
2. Check the thermostat and heater operation. Turn
off the ignition switch and cool the end cover as-
sembly to below 40°F (4°C). Using an ohmmeter,
check the resistance between the electrical pins
in the female connector. The resistance should
be 1.5 to 3.0 ohms for the 12-volt heater assem-
bly.
Warm the end cover assembly to over 90°F
(32°C) and again check the resistance. It should
exceed 1000 ohms. If it does, the thermostat and
heater assembly is operating properly. If it does
not, replace the purge-valve housing assembly,
which includes the heater and thermostat assem-
bly.
42–13 Air Dryer Desiccant
Replacing, Bendix AD–9
The desiccant change interval may vary from vehicle
to vehicle. Although typical desiccant cartridge life is
three years, many will perform adequately for a
longer period of time. To take maximum advantage of
desiccant life and ensure that replacement occurs
only when necessary, disassemble, clean, and in-
spect the air dryer. Replace the desiccant cartridge.
For instructions, see Group 42 of the
Acterra
®
Work-
shop Manual
.
42–14 Air Brake Valve Leak
Checking, Bendix TC–6
Check for leakage. For instructions, see Group 42 of
the
Acterra
®
Workshop Manual
.
42–15 Air Reservoir Automatic
Drain Valve
Disassembly, Cleaning,
Inspecting, and
Lubricating, Bendix
DV–2
Disassemble the drain valve, clean the parts with
mineral spirits, and inspect the parts. Replace all rub-
ber parts and any worn or damaged parts. Use only
genuine Bendix replacement parts or kits. Assemble
and install the valve. Check for proper operation and
leakage. For instructions, see Group 42 of the
Acterra
®
Workshop Manual
.
Brakes 42
Acterra Maintenance Manual, October 2007 42/7