


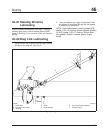


11. Fill the reservoir with ATF as needed. Start the
engine and let it idle. Have someone turn the
steering wheel from lock to lock until no bubbles
are seen in the reservoir. Turn off the engine.
12. Install a new cover gasket, the cover, and nut.
Tighten the nut 28 lbf·ft (38 N·m). Install the fill
cap.
13. Start the engine and check the power steering
reservoir fluid level. If the fluid level is low, add
ATF to bring the level up to the FULL mark on
the dipstick.
14. Close the hood and remove the chocks from the
tires.
Nelson Reservoir
WARNING
Fill only with approved clean fluid. Failure to use
the proper fluid could cause seal deterioration and
leaks. Fluid leaks could eventually cause loss of
power steering assist. This could lead to an acci-
dent resulting in personal injury or property dam-
age. Wear eye protection when changing the fluid
and filter.
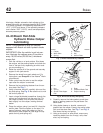
NOTE: If the power steering reservoir in the ve-
hicle looks like the reservoir shown in Fig. 3,
use the following procedure.
1. Turn off the engine, apply the parking brakes,
and chock the tires.
2. Open the hood.
3. Place a drain pan under the reservoir, and re-
move the steering gear-to-reservoir return hose
at the reservoir. Drain the steering fluid into the
drain pan and dispose of the fluid properly. Plug
the return line fitting on the reservoir.
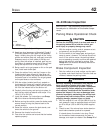
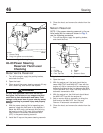
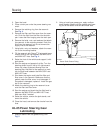
4. Loosen the clamp and remove the cover along
with the filter spring and the filter top plate. See
Fig. 3.
NOTE: Always replace the reservoir filter when
changing the fluid.
5. Remove the filter. It may be necessary to wiggle
the filter to remove it from its base. Do not use
pliers to aid in removal of the filter; pliers could
cause metal chips to enter the steering system.
Clean the inside of the reservoir using a lint-free
cloth.
IMPORTANT: Do not start the engine while
draining the system.
6. Place the disconnected end of the steering gear-
to-reservoir hose in a drain pan. Raise the front
of the vehicle with a floor jack and support it with
jack stands. Have someone turn the steering
wheel to full lock left and right. Capture the fluid
flowing from the hose in a drain pan. Add fluid to
the reservoir as needed. When clean fluid flows
from the hose into the drain pan, remove the
plug from the reservoir and reconnect the steer-
ing gear-to-reservoir hose to the reservoir. Re-
move the jack stands and lower the vehicle.
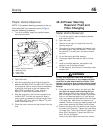
7. With the larger opening at the top, install a new
filter in the reservoir.
8. Clean the reservoir cover and gasket. Inspect the
O-ring and the cover for cracks, deformities, or
damage. Replace the gasket seal or cover as
needed.
9. Install the reservoir cover along with the spring
and the top plate. Make sure the center of the
top plate fits into the opening at the top of the
filter.
10. Place the clamp over the flanges of the cover
and shell assembly, then tighten the clamp 25 to
30 lbf·ft (35 to 40 N·m).
11. Fill the reservoir with Dexron
®
III automatic trans-
mission fluid to the FULL COLD mark.
12. Start the engine and operate it at idle. Turn the
steering wheel to full lock left and right to adjust
the fluid level and remove any existing air from
the power steering pump and gear. Check the
fluid level again. Add fluid as needed. The sys-
tem is properly bled when the steering pump
does not labor when turning the wheel.
13. Check for leaks in the system and repair as
needed. Fill the reservoir as needed.
14. Turn off the engine, close the hood, and remove
the chocks from the tires.
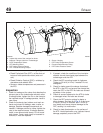
Plastic Ventra Reservoir
NOTE: If the power steering reservoir in the ve-
hicle looks like the reservoir shown in Fig. 4,
use the following procedure.
1. Turn off the engine, apply the parking brakes,
and chock the tires.
Steering46
Acterra Maintenance Manual, July 200446/4