15–01 Alternator, Battery, and
Starter Connections
Checking
WARNING
Batteries generate explosive gas as a by-product
of their chemical process. Do not smoke when
working around batteries. Put out all flames and
remove any source of sparks or intense heat in
the vicinity of the battery compartment. Make sure
the battery compartment has been completely
vented before disconnecting or connecting the
battery cables.
Battery acid is extremely harmful if splashed in
the eyes or on the skin. Always wear a face shield
and protective clothing when working around
batteries.
1. Check the tightness of the alternator bracket fas-
teners; tighten the fasteners as needed. For
torque values, see Group 15 of the
Acterra
®
Workshop Manual
.
2. Check the belt tension of the alternator drive
belt. Use a tension gauge at the belt’s widest
span, and adjust the belt tension if needed. See
Group 01 for belt tension specifications. Some
Caterpillar engines are equipped with dual alter-
nator belts; always check both belts for correct
tension. Check that the tensioner operates
smoothly without binding. Engines equipped with
a serpentine, or poly-V belt have automatic belt
tensioners and do not require belt tension in-
spection.
3. Check that all electrical connections at the alter-
nator and starter are clean. Clean and tighten all
charging system electrical connections, including
the connections at the starter B terminal and
ground terminal, and where the alternator charg-
ing cable terminates.
4. Inspect the battery cables for wear, and replace
as needed. Clean the cable connector terminals
with a wire brush. See Group 54 of the
Acterra
®
Workshop Manual
for troubleshooting instruc-
tions, and for adjustment, repair, or replacement
instructions.
4.1 Clean and tighten the battery ground
cable, terminal, and clamps.
4.2 Inspect the retainer assembly (or battery
hold-downs) and the battery box. Replace
worn or damaged parts. Remove any cor-
rosion with a wire brush, and wash with a
weak solution of baking soda and water.
Rinse with clean water, and dry. Paint the
retainer assembly, if needed, to prevent
rusting.
4.3 Check that foreign objects, such as
stones, bolts, and nuts are removed from
the battery box.
4.4 After cleaning, connect the cables to the
batteries, and tighten them to the torque
specifications listed on the battery, gener-
ally 10 to 15 lbf·ft (14 to 20 N·m).
4.5 Spray each connection with dielectric red
enamel and coat the battery terminals
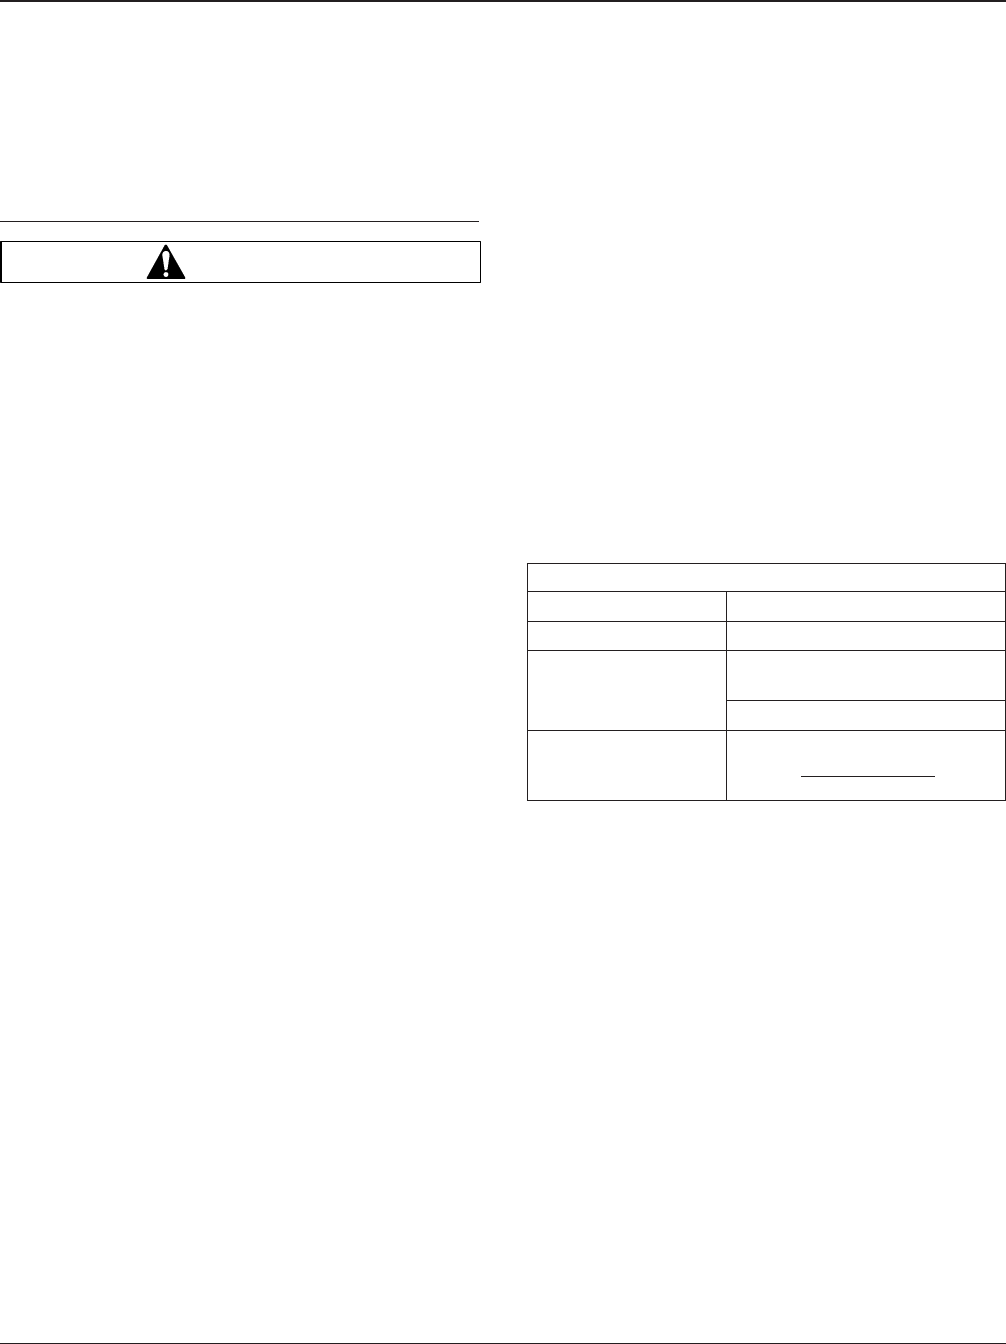
with dielectric grease; see Table 1.
Approved Dielectric Protectants
Protectant Material Approved Brand
Dielectric Grease Lubriplate FLP DS–ES
Dielectric Red Enamel
Spray-On Application
3M 1602 IVI-Spray Sealer; order
from the PDC
Spray-On B–6–665
Dielectric Red Enamel
Brush-On Application
Gyptal 1201EW-Low VOC, Red;
order at www.glyptal.com or
1-800-GLP-1201
Table 1, Approved Dielectric Protectants
5. Check the alternator wiring for missing insulation,
kinks, and heat damage. Replace or repair as
needed.
6. Check the terminals on the battery shut-off
switch and the magnetic switch. Make sure the
terminal connections are clean and tight. Coat
the terminal connections with dielectric red
enamel after cleaning.
Alternators and Starters 15
Acterra Maintenance Manual, January 2006 15/1


