


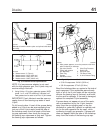
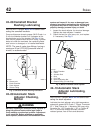

42–01 Air Dryer Inspecting,
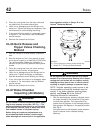
Bendix AD–9
1. Check the reservoirs for moisture. A small
amount (teaspoon or less) is normal. Larger
amounts may mean that the desiccant needs to
be replaced. Check the mounting and connecting
lines.
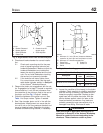
2. Tighten the fasteners that attach the air dryer to
the vehicle. Use the following torque values:
• 28 lbf·ft (38 N·m) for SAE grade 5, 3/8–16
fasteners
• 135 lbf·ft (183 N·m) for SAE grade 5,
5/8–11 fasteners
3. Check all air lines, fittings, and electrical connec-
tions for damage, leakage, or looseness.
4. Replace damaged or leaking parts, and tighten
loose fittings or electrical connections.
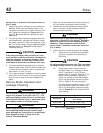
42–02 Air Brake Valve
Inspecting and Leak
Checking, Bendix BP–R1
1. Clean the valve exterior and inspect it for corro-
sion and damage.
2. Inspect the air lines connected to the valve for
signs of wear or damage. Replace the lines as
needed.
3. Check the valve for leakage.
3.1 Apply the service brakes and hold them
on full line pressure of at least 80 psi
(550 kPa).
3.2 Check the air line fittings for leaks; tighten
or replace the fittings as needed.
3.3 Coat the exhaust port and body of the
valve with soapy water, and check for
leakage. Leakage is excessive if it pro-
duces a 1-inch (25-mm) bubble within 5
seconds.
If the brake valve does not function as
described above, or if leakage is exces-
sive, replace it with a new or remanufac-
tured unit. Repeat the leakage checks
before placing the brake valve in service.
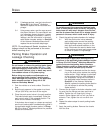
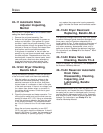
42–03 Foot Brake Valve
Actuator Lubricating,
Bendix E–8P
1. Clean any dirt, gravel, and other foreign debris
from the plunger boot and brake base bracket.
2. Check the brake plunger boot for cracks, holes,
or deterioration. Replace if necessary.
3. Lift up the edge of the brake plunger boot and
check the plunger for existing lubrication.
3.1 If the plunger is dry, remove it by remov-
ing the cotter pin from the clevis pin and
pulling the clevis pin out. Remove the pis-
ton rod and boot. Lift out the plunger. Lu-
bricate the plunger and the tip of the pis-
ton rod with barium grease part number
BW 246671, or Penzoil Adhezoplex EP 2.
Install the piston rod, boot, clevis pin, and
cotter pin.
3.2 If the plunger has grease on it, lift the
edge of the brake plunger boot enough to
apply 2 to 4 drops of light oil around the
brake plunger. Do not over-oil. Install the
plunger boot.
4. Lubricate the clevis pin with light oil.
5. Check for leakage. For instructions, see Group
42 of the
Acterra
®
Workshop Manual
.
42–04 Air Brake Valve
Operation Checking
Check for proper operation of the brake air valves.
For instructions, see Group 42 of the
Acterra
®
Work-
shop Manual
.
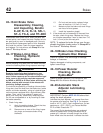
42–05 Relay Valve Checking,
Midland
1. Park the vehicle on a level surface. Chock the
tires.
2. Start the engine and run it long enough to pres-
surize the air system to at least 80 psi (550 kPa).
Turn off the engine. Repeat as necessary to
maintain 80 psi (550 kPa) pressure during this
check.
Brakes 42
Acterra Maintenance Manual, October 2007 42/1