


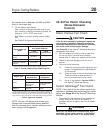

20–01 Radiator Cap Checking
WARNING
Do not remove or loosen the radiator cap until the
engine and cooling system have completely
cooled. Use extreme care when removing the cap.
A sudden release of pressure from removing the
cap prior to the system cooling can result in a
surge of scalding coolant that could cause seri-
ous personal injury.
CAUTION
The radiator cap currently installed may not be the
same one installed when the vehicle was built. If
the radiator cap must be replaced, make sure that
it is the correct cap for the cooling system of the
vehicle. Because the radiator cap pressure rating
affects the operating temperature of the engine,
installing an improperly rated radiator cap may
have adverse effects on the cooling system, and
engine operating temperatures. This could cause
premature engine wear or damage.
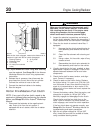
1. Using a radiator-cap tester, check the pressure
cap to see if it maintains pressure to within 10%
of the pressure rating marked on the cap. If it
doesn’t, replace the cap. Make sure that the re-
placement radiator cap is correctly rated for the
cooling system of the vehicle.
2. There is a second valve in the radiator cap that
opens under vacuum. This prevents the collapse
of hoses and other parts that are not internally
supported when the system cools. Inspect the
vacuum-relief valve to be sure it is not stuck.
3. Make sure that the cap seals properly on the
coolant filler neck seat, and that the radiator cap
gasket is not damaged. On vehicles with screw
on caps with O-rings, make sure that the O-ring
is not cracked or deteriorated. Replace the cap if
the gasket shows deterioration or damage.
20–02 Radiator Pressure
Flushing and Coolant
Changing
NOTE: For additional instructions on cleaning
and flushing the cooling system, see the engine
manufacturer’s maintenance and operation
manual.
1. Drain the radiator.
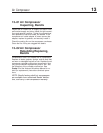
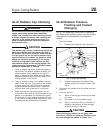
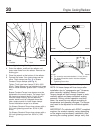
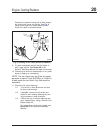
1.1 Remove the surge tank cap. See Fig. 1.
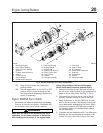
1.2 Open the petcock at the bottom of the
radiator to drain the engine coolant. See
Fig. 2.
2. Disconnect the radiator inlet and outlet hose con-
nections.
3. Flush the radiator.
3.1 Attach a flushing gun nozzle to the radia-
tor outlet.
3.2 Run water in until the radiator is full.
3.3 Apply no more than 20 psi (138 kPa) air
pressure intermittently to help dislodge
sediment buildup in the core.
CAUTION
When flushing the radiator, do not apply more
than 20 psi (138 kPa) air pressure. Excessive pres-
sure can damage the radiator or heater core.
f500107a
1
11/19/94
1. Surge Tank
Fig. 1, Surge Tank and Cap
Engine Cooling/Radiator 20
Acterra Maintenance Manual, January 2007 20/1