bi-metal rockers consisting of an aluminium
arm and steel pad, have different valve
clearances than earlier engines. Ensure that
the correct figures are used according to
engine type.
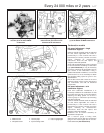
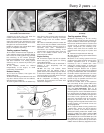
6 If the feeler blade is a tight or loose fit then
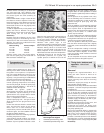
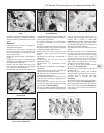
the clearance must be adjusted. To do this,
loosen the locknut of the adjustment stud and
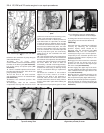
screw the adjuster stud in or out until the
feeler blade can be felt to drag slightly when
drawn from the gap.
7 Hold the adjuster firmly in this position and
tighten the locknut. Recheck the gap on
completion to ensure that it has not altered
when locking the nut and stud (see
illustration).
8 Check each valve clearance in turn in the
following sequence remembering that the
clearances for inlet and exhaust valves are
different. The valves are numbered from the
flywheel end of the engine.
Valves rocking Valves to adjust
1 In 2 Ex 7 In 8 Ex
5 In 6 Ex 3 In 4 Ex
7 In 8 Ex 1 In 2 Ex
3 In 4 Ex 5 In 6 Ex
9 Fit the rocker cover using a new gasket,
then refit the spark plugs, HT leads and oil
filler/crankcase ventilation cap.
3 Compression test -
description and interpretation
1
1 When engine performance is down, or if
misfiring occurs which cannot be attributed to
the ignition or fuel systems, a compression
test can provide diagnostic clues as to the
engine’s condition. If the test is performed
regularly, it can give warning of trouble before
any other symptoms become apparent.
2 The engine must be fully warmed-up to
normal operating temperature, the battery
must be fully charged, and all the spark plugs
must be removed (Chapter 1). The aid of an
assistant will also be required.
3 Disable the ignition system by
disconnecting the ignition HT coil lead from
the distributor cap and earthing it on the
cylinder block. Use a jumper lead or similar
wire to make a good connection.
4 Fit a compression tester to the No 1
cylinder spark plug hole - the type of tester
which screws into the plug thread is to be
preferred.
5 Have the assistant hold the throttle wide
open, and crank the engine on the starter
motor; after one or two revolutions, the
compression pressure should build up to a
maximum figure, and then stabilise. Record
the highest reading obtained.
6 Repeat the test on the remaining cylinders,
recording the pressure in each.
7 All cylinders should produce very similar
pressures; a difference of more than 2 bars
between any two cylinders indicates a fault.
Note that the compression should build up
quickly in a healthy engine; low compression
on the first stroke, followed by gradually-
increasing pressure on successive strokes,
indicates worn piston rings. A low
compression reading on the first stroke, which
does not build up during successive strokes,
indicates leaking valves or a blown head
gasket (a cracked head could also be the
cause). Deposits on the undersides of the
valve heads can also cause low compression.
8 Although Peugeot do not specify exact
compression pressures, as a guide, any
cylinder pressure of below 10 bars can be
considered as less than healthy. Refer to a
Peugeot dealer or other specialist if in doubt
as to whether a particular pressure reading is
acceptable.
9 If the pressure in any cylinder is low, carry
out the following test to isolate the cause.
Introduce a teaspoonful of clean oil into that
cylinder through its spark plug hole, and
repeat the test.
10 If the addition of oil temporarily improves
the compression pressure, this indicates that
bore or piston wear is responsible for the
pressure loss. No improvement suggests that
leaking or burnt valves, or a blown head
gasket, may be to blame.
11 A low reading from two adjacent cylinders
is almost certainly due to the head gasket
having blown between them; the presence of
coolant in the engine oil will confirm this.
12 If one cylinder is about 20 percent lower
than the others and the engine has a slightly
rough idle, a worn camshaft lobe could be the
cause.
13 If the compression reading is unusually
high, the combustion chambers are probably
coated with carbon deposits. If this is the
case, the cylinder head should be removed
and decarbonised.
14 On completion of the test, refit the spark
plugs and reconnect the ignition system.
4 Timing chain, tensioner and
sprockets - removal and
refitting
3
Removal
1 Support the engine/transmission on a
trolley jack with a block of wood as an
insulator.
2 Release the nuts on the right-hand flexible
engine mounting at the base of the timing
chain cover.
3 Raise the engine just enough to clear the
side-member and anti-roll bar.
4 Remove the auxiliary drivebelt as described
in Chapter 1, and the fuel pump as described
in Chapter 4A.
5 Unscrew and remove the crankshaft pulley
nut. To do this the crankshaft must be held
against rotation by jamming the starter ring
gear. Remove the starter, as described in
Chapter 5A. Alternatively, if an assistant is
available, apply the brakes fully with a gear
engaged. Withdraw the pulley.
6 Unbolt and remove the rocker cover, and
disconnect the spark plug HT leads.
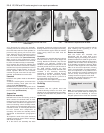
7 Unscrew and remove the timing chain
cover bolts. Take off the cover and extract the
fuel pump operating rod.
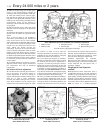
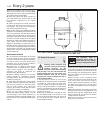
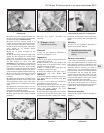
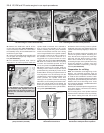
8 Turn the crankshaft either by temporarily
refitting the pulley nut or by engaging a gear
and turning a front wheel (raised) until the
timing marks are located in the following
positions. Camshaft sprocket mark between
two bright links on chain. Crankshaft sprocket
mark opposite centre of single bright link (see
illustration).
XV, XW and XY series engine in-car repair procedures 2A•3
2A
2.7 Adjusting the valve clearances
4.8 Sprocket timing marks and timing
chain bright links aligned
a Camshaft sprocket timing mark
b Crankshaft sprocket timing mark


